Tuesday, March 30, 2010

Repurposing Part 2: Take a deep breath and cut the wedding dress into pieces

Yesterday, I took the day off to start work on a Christening ensemble for my new nephew, Little C, made from his mom's wedding dress. Here is my sister with the dress:


Poly with the dress front

And back

The first step was to decide what pieces to make, which pattern to use and how to lay it all out. We settled on Simplicity 5813 for the bodice, skirt, romper bottoms, jacket and bonnet, and then use the booties from Simplicity 2457. The pattern is relatively simple - no pleating, no added trims. This was a conscious choice on our part, since we want the embroidery and beading from the dress to really play a starring role. While Poly cut out the pattern pieces, I dismantled the dress. Then we laid out all the pieces, deciding how to utilizing the gorgeous beading and trim.

I was freaking out a bit at this point.
This is my sister's wedding dress, in pieces on the floor.


We didn't have as many large non-beaded areas of satin to work with as we had hoped because of the dress' seams and beading. So, instead of trying to shoe-horn all the pieces in, we decided that we will purchase some light blue satin to make into the romper bottoms. This allowed us to be very strategic about laying out the rest of the pieces in order to use the beading to maximum advantage. Also, it will ensure that the outfit - once the skirt is removed by a hidden row of snaps - is perfect for a baby boy.

We spent the rest of the day laying out and cutting. Here is a preview of some of our pieces. Poly really does have an eye for this sort of thing.

Jacket front

Jacket back.

Skirt Front. This is the beading from the train of the dress.

We also cut out lining from cotton batiste that I bought on Friday and transferred all the pattern markings using tailor's tacks rather than risk marks on the fabric. Poly will do some additional prep work during the week before we regroup over the weekend for the actual sewing.

I'm feeling incredibly optimistic about this project. If it all goes smoothly, the ensemble will be a thing of beauty. My greatest concern is that we have limited time and are going to have to do a lot of hand sewing. In addition to finishing seams, the beads were literally cascading off the dress as we worked on it. So, we are going to have to do lots of re-attaching. Other than that, it is full steam ahead.

Sunday, March 28, 2010

How long is too long for lunch on a Friday when there are fun people to fabric shop with?

An office near the Garment District has some perks. On Friday, that perk was getting to meet up with several other sewing bloggers for lunch, sewing chat and shopping. Peter of Male Pattern Boldness fame summed up the day beautifully.

I wasn't looking to buy much. Really, I went for the conversation and the opportunity to pick up any pearls of wisdom from other people who share my hobby. Here's what I learned:
  • I need to get over my fear of prints. Elizabeth, of Sew a Beginner, totally set the example by scoring some gorgeous print knits at Spandex House and MetroTextiles. She was also wearing a beautiful print dress that she had sewn, which brings me to my next point...
  • I really ought to make an effort to wear more dresses and skirts. Trena, aka the Slapdash Sewist, who was the instigator of the meet up, was also wearing a beautiful print dress that she had sewn. In my mind's eye, her closet must be jam packed with an endless number of dresses, one cuter than the next.
  • There is no time like the present. Mikhaela, of Polka Dot Overload, really is seizing the day by launching a new blog and sewing up a storm while 6+ months pregnant. I need to learn to just go for it and take on more projects that will stretch my skills.
  • And finally, I need to take more fashion risks. Peter is fearless, and I don't just mean about the "sheets of shame" shirt that he wore to the outing. He really is bold, diving head first into sewing and following his bliss with it. Then again, he's got a wonderful role model in his cousin Cathy.
It was a great afternoon, and I was sorry to have to head back to my office after my absurdly long lunch break. Many thanks for the company and chat!

Thursday, March 25, 2010

Thanks and Oddities!

When I started my blog, it was definitely with the thought that it was a nice way for my friends to keep up with me and a great way to chronicle my hobbies. I was hoping to share a few recipes and keep myself motivated with sewing, which was a new hobby for me. Then about a month ago, I hung out a "Follow this Blog" shingle and now there are 16 of you! Thank you so much for reading my blog and commenting on my projects. And a special thanks to GwenSews, who awarded me a Sunshine Award on Monday!

I'm sorry to say that I still have not photographed the latest pants muslin. I'm a bit pressed for time this week and feeling rather snarky. So, I feel compelled to share... I received an email about Vogue Patterns' spring collections today (correction 3/26: it was about their summer collection). The pattern that most jumped out at me - and not in a good way - is this Chado Ralph Rucci caftan. (Really, has "caftan" ever been associate with anything good?)


I'm not sure what is worse: the pattern itself or that it is a close relation to the Lanvin garbage bag dress, that Tilda Swinton wore to the Oscars last year. Not even an original monstrosity.

In fairness to Tilda, her dress had a bit more shape and somewhat less potential for her to spread her arms and be blown away like a kite on a blustery day. (See, I told you I was snarky! I'm not sure what has gotten into me.)

What do you think?

Tuesday, March 23, 2010

Repurposing: The Deluxe Edition

Last week, I mentioned a project involving my nephew, Little C. It cropped up when I received an email from my sister, Polyhymnia, saying "I'm thinking of turning my wedding gown into a Christening gown for the baby. Am I crazy? What do you think?" She was inspired by this interview on Threadsmagazine.com.

After several emails, and her solemn promise not to cry when we cut into her wedding gown, I offered my help. Poly sews some, is very crafty and artistic in general, has a wonderful eye for detail, and is meticulous and careful. In other words, she has all the makings of an excellent sewist, and I am confident that she will do a great job. The one thing she was nervous about was laying out the pattern on her dress and making decisions about cutting and re-purposing trim. (Wouldn't you be too? I sure would.) So, on Monday, that is where I will help her get started.

We will primarily be using Simplicity 2457 (above). However, if we have enough fabric, we will make the jacket from Simplicity 5813 (below). Poly wants to make the gown convertible - from gown to romper via hidden zipper under a waist band, as the article suggests.


I have to say, I am excited and wary at the same time. On the one hand, baby clothing is not very fitted and so it is very forgiving. On the other hand, we are cutting up my sister's wedding gown. I have no idea what it will be like to work with. Wish us luck.

Monday, March 22, 2010

Nomad Hobo: L7

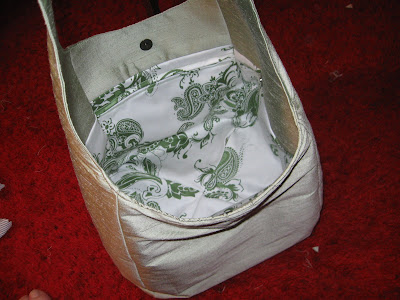
Well, I finished the Nomad Hobo bag that I ranted about last week. If a picture says a thousand words, what this one says is "meh". That is pretty much how I felt when the last stitch had been sewn on Saturday morning.

My best attempt at artfully slouched.
It will not stay like this on my shoulder.

Aside from my frustrations with the pattern markings and directions, I just don't think it lives up to it's billing. On Fabric.com the description says, "Wear this stunning, roomy bag slung casually over your shoulder for the ultimate in everyday glamour." Quite frankly it is just not the right shape. Empty and full, it looks rather square. Which it is. Oh dear, I'm not really explaining this well. Hmmm. In the drawing, the bag looks like it has wider sides and narrower ends. From the drawing and the description, I thought the bag would kind of slouch into hanging like that (I tried to make it do that in the above photo), and it just doesn't, or at least not in a good way. It ends up feeling very wide under my arm - boxy.

See? Look how very square it is. One big cube!

Howe
ver, the bag did grow on me during the course of the afternoon. It was such a nice day, that I decided to do some work on the porch, where Phin was grilling. So, I tossed all the things I wanted to work on into the bag to tote outside. Sitting on the porch next to my lawn chair, the bag looked so very cute with all my various crafting junk peeking out of it, that Phin even commented. And it was the perfect shape to reach in and find whatever I needed.

With stuff in it. See? Still square!

That is when I decided that it is actually the perfect bag for a knitter (which I am not) to keep their yarn in or to tote around fabric or other crafty supplies for on-the-go crafting. Also, it would be very good for the supermarket. When I just need to pick up one or two things, I will just stick my wallet and keys into the pocket and go, rather than taking a reusable shopping bag and my purse. So, I think this bag will see some action, just not quite the glamorous future of brunches in Soho with my girlfriends that I had imagined for it.

So, I guess in the end, my assessment is that, although I've lost a hobo bag, I have gained a shopping bag... an irridescent green silk dupioni shopping bag. And in fairness, this is a very cute bag, but it just shouldn't be promoted as a slouchy hobo, but instead as a carry-along craft bag. Ok, gotta run, I have some fabric that needs toting around the house.... or some groceries to pick up or something...

Friday, March 19, 2010

Stashaholics Anonymous: How Did This Happen?

It started out innocently enough: On my lunch break yesterday, I just wanted to pick up some black jersey, which I like to keep in my stash. And maybe look for something in turquoise, which is my favorite color to wear in warmer months... enough to make a summer top.

Well, $84 and 14 yards later I found myself lugging the new additions to my stash back to my office, the fingers of my bag-holding hand steadily growing numb.

How did this happen?, I asked myself. How did I go from "a few basics" to discussions about "my summer wardrobe pallet"? How did a few necessities morph into an $84 splurge?!?!? How did a few yards become as much fabric as I could carry? How?!?!?!?! How did this happen?!?!? To me?!?! Again!?!?!?! I'll tell you how this happened: Kashi!

Kashi is the most dangerous man in the Garment District. His charm, attention and wily sales moves will send you home with yards and yards of (really beautiful) fabric, having spent more than you planned (but less than you would have anywhere else). My only strategy is to avoid Metro Textiles unless I am planning on buying. Browsing there always leads to buying, because he always has something new and nice that will not last. Once I go in, resistance is futile.

Here are my fabulous buys:

2 jerseys and 3 beautiful lightweight knits. This does not include the black jersey.

As I headed to the door mumbling "my husband is gonna kill me", Kashi calmly advised, "just tell him the fabric guy made you. Just don't tell him it was me." We agreed to blame Mood instead.

Thursday, March 18, 2010

Muslin 3.5

I'm feeling like I've made progress since muslin 1.0, and the end is in sight. Right now, version 3.5 of the pants muslin is fitting pretty well through the crotch. I have to fine tune the crotch length a little, but nothing major.

I should have pressed the muslin. The wrinkle under the right cheek is just that, a wrinkle from a moment when I wadded up the fabric and hurled it across the room.

The one remaining problem is the long creases running from thigh to knee. I think this is because I added fabric to the thighs to accommodate the ol' saddlebags, and probably added a little to much and didn't do the best job blending it in. So, really, I think this is just a matter of taking out the basting stitches and pin fitting the side seams so that everything falls smoothly and the seam hangs straight. (I could be wrong.)

Phineas has volunteered to help me pin-fit the pants.

Yes, that sentence deserves it's very own paragraph and you should imagine ominous music playing in the background when you read it. You see, the last time Phineas tried to help me using a pin, he stuck me so hard - and right on the bum, too! - that I shrieked, jumped so high I nearly hit my head on the ceiling and then proceeded to swear a blue streak. I'm not sure who was more traumatized by the experience, me or him. Probably him. But he is now looking at pinning as a challenge he must master. It could be fraught with danger for us both (I cannot be held accountable for my involuntary responses to being gored with a pin). However, I am going to be brave. If he does master pinning without leaving me full of holes, it could make fitting much much easier.

Anyway, Saturday is when we plan to work on this, and part of me is wishing the weekend would hurry up and get here. The other part of me is cringing. (Sorry, sweetheart. I know you will do your best. And I will do my best to laugh off any mishaps.)

Wish us luck.

Tuesday, March 16, 2010

HotPatterns: Like a Moth to Flame

Well, folks, it's happened again. Burnt by another HotPatterns pattern. I can't seem to help myself; I like their style.

The project, a hobo bag, was supposed to serve as a little break from working on my pants muslin. A quick, no-fit project, made from my stash, that would finally end in me having a bag of my own after making so many bags for others. But it was not to be. Am I being a bit melodramatic and writing run-on sentences? Well, yes. I can't help it. I'm irritated.

Here is the offending bag.

What happened was this: I used the free HotPatterns "Nomad Hobo" that is available on Fabric.com. (Yes, I already know what you are going to say: you get what you pay for.) I was happily sewing along, relaxing and following the instructions. It was coming together so very quickly and easily - I was nearly done assembling the bag! That's when I realized that something was very wrong. Where the pockets and closures were made no sense. In fact, they were completely backward!

I flipped back in the instructions, sure that I had done something wrong. But no! I had followed the instructions to the letter. The instructions and pattern markings are just plain wrong! They have you attach the magnet and pockets to the end pieces - the pieces with the straps. Look at the image above and tell me exactly how that is supposed to work. Aaarg! It doesn't! The closure should be on the inside of the bag roughly where the girl's elbow is - right? - attaching one side of the bag to the other. Double aaaarg!

Here is my re-do. The side pieces of the lining, with pockets and magnetic closure.

I basically had to undo an hour's work. And, since I made the bag with a remnant, I don't have extra fabric. This is not a problem for the pieces with pockets, which I swapped with the same shaped pieces that didn't have pockets. And I had an extra magnetic closure to attach in the correct place. However, once you attach the closures you really can't undo them without leaving holes behind. So, now the bag has an extra superfluous magnetic closure at the base of each strap.

Is this a deal breaker? No. I don't think so. I like the fabric and will finish the bag. Anyway, it is now unsewn and I've begun sewing it back together. So, it should be easy to finish. Knock on wood. So much for an easy project that I wouldn't have to think about.

Monday, March 15, 2010

Beware the Ides...

After taking the end of last week off, I'm having a hard time pulling myself together this Monday. It doesn't help that it we sprang ahead an hour for daylight savings and it is absolutely dreary out.

Et tu, Shoe-te!

On Thursday night I went through my shoes and bags. All of these are either dated, worn out, have been replaced by something better, or are just not comfy. I'm a bit conflicted about the red pointy ones. They are comfy and not too heavily worn. I just feel like they are a bit dated at this point.

However, this wraps up my wardrobe purge and I am now on to the sewing/buying phase of the project. The trouble is, I spent a whole day shopping on Friday, with only one top and a scratch on the neck from a zipper detail to show for my efforts! I just can't seem to find anything to buy that is nice and feels good. The fabrics are so very cheap right now. (Seriously, I tried on one top that was so flimsy, that I am sure it would have blown apart if I sneezed too hard. And allergy season is on the way.) So, I have a lot of work to do.

I have more show and tell planned for this week. Aside from my ill-fated shopping trip, I was busy sewing over the weekend, but just couldn't pull myself together to photograph things. However, I do have updates for you on my pants muslin, a hobo bag I am working on and a possible project for my newest nephew, Little C. So stay tuned.

Wednesday, March 10, 2010

Spring Cleaning: Wardrobe Purge


On Thursday evening I executed the first phase of Spring Cleaning my wardrobe: the purge. Here are the results:


If I didn't love it or if I didn't like the fit, it got weeded out. A slew of tops and sweaters, 2 pairs of pants, 3 dresses, and an assortment of belts and scarves will go to Goodwill if they are in good shape or the rag bin if they are not.


I am looking for good homes for a few tops which I like, but never seem to wear (ie: they are really nice, but are just not working for me for whatever reason). Three of them have gone to Dr Kiang already. They are all barely worn, so they can always be added to the Goodwill bag if no one wants them.


Two beloved tops and one fantastic dress have been moved to the alterations pile. They are all in good shape and are just a bit too large at this point. But I think that all of them can be altered easily enough.

After photographing the purge, which accounts for my closet and 2 drawers, I also weeded through my athletic wear. For whatever reason, I seem to do a pretty good job curating my more functional garments (ie: socks, pj's, athletics and underwear) so there isn't much to show. Phineas also added a few polo shirts, helping to fill an enormous garbage bag.

Garbage Bag full of purged clothing,
Oh, and the old running shoes have to go too.

What's left? Well, not a whole lot. I've never been one to have a large wardrobe. But there are still tops and bottoms that are starting to show their age. The problem is that I don't have any replacements for them. Also, there are a few tops that had been buried in the back of the closet or drawers that, now rediscovered, I am hoping to put back into regular rotation. I also have to go through my purses and shoes getting rid of those that look dated or worn, or are not comfy, no matter how cute they might be (see, I am being strict with myself).

I have the next two days off. I plan to purge the shoes and purses, and then it is on to phase two: shopping and sewing replacements (or trying to, at any rate). Sigh. This is hard work!

Tuesday, March 9, 2010

Very Easy! Vogue 8558

I finished my vogue top on Friday, and was so happy with it that I wore it to Magenta's birthday day of crafting on Saturday.


I am sure I will be making this top again. It is such a great basic. And I really like how the neck (made of satin) is shiny compared to the rest of the shirt. The only thing I would do differently is grade the pattern out to a size larger in the hips. I didn't realize how long the top would be when I cut it. Thank goodness I made it from a super stretchy jersey.

I'm not done with the blue top yet. But I have learned something very valuable about myself in the process: I like natural fibers. The Vera luxury knit that I am using for the blue top (and which is poly) is just not the right fabric for me. It's ok, just not what I will buy in the future. I look at the clothing in my wardrobe and what I like to wear, and it is almost exclusively cotton, wool, satin or blends. Hopefully, this knowledge will help guide my fabric shopping to more hits and fewer misses in the future.

Monday, March 8, 2010

Happy Birthday, Magenta: Chocolate Buttercream


I've been wanting to test out Chocolate Buttercream recipes pretty much since my vanilla buttercream frosting went over so well at Dr Kiang's shower. Magenta's birthday seemed like an ideal opportunity to make cupcakes, so off I went to the kitchen.

I used my go-to yellow cake recipe from King Arthur Flour. Honestly, if you like to bake, even occasionally, and don't own the KAF Bakers Companion Cookbook, you are missing out. Anyway, I halved the recipe to make just 12 cupcakes, since we weren't going to be that large a party.

The jumping off point for developing my take on chocolate buttercream was this recipe from Martha Stewart. It is similar enough to my vanilla buttercream that I was pretty sure that the results would be good. The real questions was just how chocolaty it would be. Here is what I ended up with (keep in mind that I halved the frosting too - this is enough for 12-15 cupcakes to be generously frosted):

Chocolate Buttercream a la Clio
1/2 lb (2 sticks) unsalted butter, softened to room temp
6 oz semi-sweet or bittersweet chocolate, melted and cooled
2 1/2 cups of confectioners sugar
2 tbsp cocoa powder (ie: unsweetened)
3/4 tsp vanilla (any other flavor would work as well)
Whip the butter with a hand held beater or stand mixer for a minute or two to get it softened up. Add the melted chocolate and vanilla, and beat to combine. Add sugar and turn beater on low so you don't create a dust storm. Gradually increase speed to get the sugar incorporated. At this point, I tasted the frosting and decided it was nice, but not chocolaty enough for me. So, I added 2 tbsp of cocoa and beat to incorporate. Better!
In the future, I will probably use more cocoa and a bit less sugar - 1/3 cup of cocoa and 2 cups of sugar should be about right. I really like my chocolate dark. But if you are a milk chocolate lover, this version will be heaven for you.


One leftover cupcake for Magenta.

Also, our day of crafting was fantastic. I didn't get to the tee renovation, but I now have a working pattern for Magenta's summer pants. Magenta herself worked on knitting a mouse stuffed animal for a baby gift, and Dr Kiang made a necklace for herself. More on my projects later this week.

Friday, March 5, 2010

Sequined Sequel

Tomorrow, Dr Kiang and I will help Magenta celebrate her birthday with another installment of the Sequined Craft Lounge. Yup, we had so much fun last time that we will converge at Magenta's home once again with fabric and jewels, scissors and glue guns in tow for a day of crafting.

Here's what I plan to work on:

Finish drafting Magenta's summer pants pattern - How many ways can you say "long over-due?" Now that Magenta is learning to sew, the best birthday gift I could bestow is a pattern for her favorite pants, which she wore into the ground. This way, she can make them over and over in as many different styles and colors as she wants.

Tee shirt makeover project - Magenta will be getting a full day's work out of me, apparently. She told me that she is planning a tee shirt alteration as her first sewing project outside of a classroom and would love my help. So, I am going to bring a few tee's of my own which need to either be made over or tossed.


Sentimental attachments: old concert tees, my 1st scuba
diving tee, turkey trot tee and one misc unsentimental tee

I hope you have some fun and crafty weekend plans too!

Thursday, March 4, 2010

Mishmosh: Projects, Books and Spring Cleaning

Things are still busy at the office this week, and it is frustrating to not be in the Craft Lounge. Thankfully, I am taking tomorrow off and plan to spend the day sewing, running and baking, but in the interim I am trying to get myself mentally organized.

Projects
Here is a mini re-cap of where things stand with my current sewing projects:
  • Amazing Fit Pants - Muslin 3.0 is cut and ready to be sewn. Let's hope that this is the final muslin! Then it will be on to sewing pants. Many many pants. In every color and style.
  • Vogue Black v-neck top - I worked on this last weekend and it is very nearly done. All that I need to do is finish the armholes and hem it. It is much longer than I initially thought it was going to be. So, I have to decide how much to hem.
  • Blue Cowl Neck top - I haven't made any progress on this since my last post about it. It kind of got shunted to the side in my pants obsession. However, I will pick it up again most likely this weekend.
*****************************************************
Books
Now that I am sewing primarily for myself, and not making any gifts or taking on any alteration projects, I decided that it was time to add to my sewing library. So, I decided to start with two classics that other sewists swear by - the popular Palmer/Pletsch Fit for Real People and Pants for Real People.

The styles may be dated, but the advice is sound!

They arrived on Tuesday and I've thumbed through them over the last two nights. Already the books have demystified a few sewing issues for me. I can see why this series is a must have for sewists and glad to have it in my collection.


*********************************************************
Spring Cleaning


Lastly, I've noticed that with spring coming, many other sewing bloggers are thinking about their style, or lack of one. I've been suffering in that department, too. I lost a chunk of my wardrobe when I lost weight. And a lot of the replacement clothing I've bought in the last 12-18 months has not lived up to the style or quality of what it replaced. A wardrobe purge is imminent.

I am hoping that my pants project will help jump start a wardrobe makeover for me. I do not have favorite pants at the moment, but there are at least 5 beautiful fabrics for pants in my stash. And now that I am on my way to making great pants for the first time, I feel as though I will have the basis for building a great wardrobe. More on this subject will follow...

Tuesday, March 2, 2010

Advice for MarMar

Last week, you may have noticed that MarMar left a long comment on my blog. She said:

...I have a project...my sister-n-law is getting hitched in June and everyone(including me) is in the wedding party. I decided instead of driving myself crazy or broke buying a dress for Ms. Abigail [Mar's infant daughter], that I would buy the traditional white flower girl dress in an infant size and add an apron to it with a teal sash and a pretty skirt(no bib).

JD thinks it is because I kinda ODed on last seasons Project Runway episodes since being on maternity leave (they run on Sundays on one of the Lifetime channels). He said very supportively, "make it work".

So, I got a swatch of the teal bridesmaid dress and went to JoAnn Fabrics(no independents here in CT). I found a close match for the sash in teal taffeta and pretty organza in a very light blue(goes well with the taffeta).

Now I have fabric, thread and needles. MMM...any advice? I don't have a pattern cause it seems nobody makes aprons for infants. My sewing machine is circa 1880(no lie) and I think I trust my hands more.

If all else goes wrong, little Abby will just wear the white flower girl dress!
Mar, I applaud your can-do attitude. And I think you have picked a pretty straightforward project that is absolutely do-able. Here are a few suggestions:
  • Many people swear by the old sewing machines. They are made of metal parts (rather than the flimsy plastic of today) and have very long lifespans and consistent results. I would test out the machine on some scraps of fabric and see if it is perhaps better than you think.
  • Scraps - since I am on a muslin kick, I would suggest that you make a test version of the apron before cutting into your beautiful fabric. It will help you figure out how to go about the project and make you more confident when it comes to the actual sewing.
  • Check out some similar patterns - I'm going to copy and send you some pages from an apron making book that I own. Even though you will be making a mini-version, the basic way to make an apron is the same at every size. So, this should give you a road map for constructing your apron.
  • If you are worried about how large or small to make the apron, why not buy a pattern for a baby's dress or skirt and use the piece for the front skirt as the pattern for your apron front. Then all you have to do is create the sash.
Well, I think that is the most crucial info. And if worse does come to worse, you can always just make the sash. I have no doubts that a daughter of yours can make it work!

Happy sewing, MarMar! And love to your mister for being so supportive.

Monday, March 1, 2010

Muslin Convert

I've always thought that I just did not have enough sewing time to waste on making muslins. But I have seen the light. Over the weekend, I made pants muslin 2.0 and 2.5, and then cut 3.0 for my Amazing Fit Pants. I had been tempted to scrap this pants pattern after my initial batch of problems. I'm so glad I didn't!

After my initial posting, I had an epiphany: what if the changes I made to the front of the pants to fix the bagginess in the crotch were negatively affecting the back? So, I undid the changes and immediately things were a bit better in the bum. But not perfect. And now the front was a problem too.

In muslin 2.0, I tried to fix both problems by shortening the crotch length in the front while lengthening in the back. The back tuned out somewhat better to be sure, but the front was worse somehow. This is where I had a critical second epiphany about the crotch of these pants. There are two components to the crotch: depth and length.

Crotch depth (distance from waist to crotch)


Crotch length or circumference
(distance from back waist, between the legs and to front waist)


I'd already figured out that the length was too short in the back. But what if the pants were simultaneously too long in the crotch depth? That could cause the bagging in the front. To test this out, I made muslin 2.5, combining the front of muslin 1.0 (the original, better-fitting front) with the back of muslin 2.0 (the better-fitting back). Now, I had enough crotch length. So, on to playing around with the depth. I made a tuck across the tummy and back (about midway between the waist and crotch) to essentially hike up the crotch about 1.5".
I shortened the pattern at the
crotch depth alteration line


Voila! The bagging in the front disappeared and so did the cupping in under the bum in the back. The crotch was looking good and feeling comfy too! However, there were still a few wrinkles across the back thighs.

And this brings me to muslin 3.0. One of the very helpful sewistas at PatternReview pointed me to an article on Special Alterations to Pants that, in part, dealt with "pones" (aka saddlebags). I think the remaining wrinkles are cause by pulling across the saddle bags. Essentially, I need some extra room in the outer thighs. So, this is the purpose of muslin 3.0, which is all cut and ready to be sewn. I'm optimistic that this could be the final version, but if I need to do some fine tuning and make a 4th muslin, that is ok, too.

I can't believe how far I have come with these pants over several muslins and one obsessive weekend. I never would have been able to test out different alterations and fine tune the crotch this way if I had been working with the real pants fabric. Anyway, I am now SOLD on muslin!

PS - Sorry I have no photos of muslin 2.5. My photographer was under the weather yesterday. If he is up to it tonight, I will get some pics.