Monday, October 29, 2012

Frankenstorm Preparedness

Washington Post image


Phin and I are hunkered down and watching storm coverage. At times like this, I'm glad we live on a hill.

Yesterday, while Phin was checking that the flashlights had batteries and the lawn furniture was put away, I was moving my sewing machines away from the windows and making sure that the lids of the sweater boxes that house my fabric stash were securely fastened. If a window in the Craft Lounge (which doubles as a guest bedroom) breaks, I'm counting on the bed to act as a giant sponge, since it's between my sewing machines and the windows.

Is it odd that I would rather replace a queen size bed than any of my sewing stuff? Or is it a sign that, as a sewista, I have my priorities straight? 

Anyway, I hope that if you are also in the Northeast that you are high and dry and have a good many projects to keep you busy while we wait out the weather! I'll be knitting away and tracing my kimono pattern.

Friday, October 26, 2012

"Life is uncertain. Eat dessert first."

Wise words from Ernestine Ulmer.

I meant to do a series of posts about my various bday month projects - sewing, baking, knitting and general indulgences. But so many indulgences left little time for blogging. So, belatedly, here is a wrap up and also what I ate on my birthday:

Thank you, Dorie Greenspan!

I know. It isn't cake. But you have to admit that birthday Gianduja Pudding served in a champagne glass is pretty awesome. I keep a folder of recipes that I've ripped out of magazines and newspapers. This recipe was inspired by Dorie Greenspan's Chocolate Pudding. The only real change was that this version, by Sara Dickerman, incorporated hazelnuts for a nutella-like flavor. MMmmmm....

I've been on a pudding kick lately because of running. Drinking a tall glass of chocolate milk is actually one of the best things you can do for yourself to recover from a hard workout. So, it really wasn't much of a leap to chocolate pudding for post-run refueling, and from there to making my own from scratch. And from there to making this truly luxurious version.

Not jello pudding.

This pudding is an all grown up and no skimping on the chocolate and egg yolks version. If, like me, you grew up with Jello Pudding with Cool Whip on top, this will be a revelation to you. 

The Wrap Up
My first indulgence was to participate in K-Line's lingerie shop along. I'm happy to report that all my new lingerie fits beautifully, especially the Passionata set from Fig Leaves which is even prettier in person. It arrived from the UK in a speedy 10 days. Bravo, Fig Leaves!

I've been celebrating in waves all month - dinner with Phin on my Bday, dinner with my parents the weekend I gave my mom the Victory Socks, running with Mar Mar and an Oktoberfest party with my family... And now, I am at the start of my Kimono project -  sheer indulgence. But all things must come to an end. My last Bday festivity is tomorrow - a visit to a Haunted House and drinks with some close friends. And, ladies and gents, I will be wearing my completed leather jacket.

So, tune in on Monday! Have a great weekend!

Thursday, October 25, 2012

Lace (swoon) and My Kimono Project

File this one under new vices, right next to silk and cashmere.

On Tuesday night I attended a seminar at Mood on lace, lead by Susan Khalje. The hour-long talk covered the different types of lace, how to use them, best techniques for working with each, and tips for buying. Best of all, Susan brought lots of sample garments - many of which were recognizable from Threads - to illustrate her points. What's clear to me is that prior to Tuesday, I didn't even realize how much I didn't know about working with lace. Every few minutes, there was some new revelation.


A "white shirt"

That is not to say that the class was overwhelming in the least. It was not. At one point, Susan made a Cinderella reference (to the Disney birds that help with the sewing) and from that moment on I could not help but think of her as every sewist's fairy godmother. She has such an encouraging and calm manner, that with a little "bibbidi-bobbidi-boo", I feel like I could make something spectacular out of lace.


Would you just look at that corset!

Anyway, I thought  it was just the right intro to lace and definitely got my juices flowing for my upcoming kimono robe project.


Burdastyle 07/2011-124 - Kimono robe


Speaking of which, after hearing about luxe guipure, delicate chantilly and gorgeous alencons, I'm somewhat  bashful to confess that I'm going lowbrow with my fabric choice for the kimono. I need a project with fabric that I'm not worried about ruining. So, I'll be using a very fun and inexpensive animal print lace that I bought on a whim at Chic Fabrics a year or so ago.

I'm trying to decide what color silk to use for the lining. I tried a bunch of fabric from my stash just to test the color (none are actually fabric that I'd use for this).


 At first I thought about a pretty rose color, but I think it just looks too 80's retro and, well, tacky.


I tried a light blue, also. Oddly in this photo it made the lace look brownish. It's black.


And then I tried an oyster color. It's the best of the three, but I would love some input. At this point I'm leaning toward a metallic or neutral-ish color - silver, oyster, champagne... Given my general mental state in the morning (ie: murky until after coffee), I think a robe that is too bright will hurt my brain. Any thoughts for a color or color family to pair with this black animal print that I haven't thought of?

Thanks for the input!

Monday, October 22, 2012

Leather Jacket Lining: Facings and Bagging and Sneak Peek


This weekend, I tackled the leather parts of  lining my jacket. Here's a preview shot.


Look! A jacket!


Burda instructs you to attach the facing pieces to the lining pieces during the construction process. Back at the outset of this project, I foolishly listened. Then when it comes to lining, you bag the lining/facings as one piece (this) into the shell (this). Not that there is anything necessarily wrong with this method, but it makes grading and turning the edges where leather facings are sewn to leather shell more cumbersome and challenging, IMHO.

It would have been easier to work with the facings on their own, finishing all the edges around the collar and zipper. Then I could have dropped in the lining with the facings and jacket edges neatly turned and finished. Live and learn, I suppose.

Anyway, to start getting over this challenge, what I did was machine sew the front edges of the jacket to the facing pieces, stopping at the facing/lining seam line. Then, I obsessively trimmed the seam allowances and turned the facings/lining to the inside, pressing carefully while making sure that the seams rolled slightly to the inside. This was challenging.

There was a lot of bulk at the shoulder seams and along the lapels. The jacket  is topstitched underneath the lapels so the stitches are not visible from the outside, a necessary step. The back collar is also topstitched. I actually had a lot of trouble top stitching these bulky areas and (shame!) had to rip out and re-do the collar stitching when I got a bobbin nest there.

To prep the rest of the jacket for lining, I turned up and pressed the hems of  the rest of the shell and put a strip of 1/4" leather tape close to the turn. This way, my hems are set, but with lots of allowance to work with. So, now I can move forward with hand stitching the lining to my hems.

Hem - turned and taped.

I did this to the sleeves too. 


Here are a few tips that I've picked up from various places that came in handy:
  • Leather is bulky, but it doesn't ravel. Grade your seam allowances carefully and trim the ends at places where there will be bulk (Sunni did a good  post on this).
  • When you grade, the side that you want the seam/seam allowance to roll toward is the one you should trim (ie: the fabric/seam will roll to the shorter seam allowance). So, in general you will usually be trimming the lining or facing seam allowance so the seam rolls to the inside. I intuitively knew this, but only recently saw it confirmed by someone else - new-to me-blogger Madalynne.   

Graded seams. Sorry for the dark splotch caused by my hand I think.

I didn't really talk about sewing on the silk lining fabric, but I know lots of sewists worry about sewing silk or others fine or slithery fabrics. So, here is what works for me:
  • I prefer a microtex needle for the job. It has a very sharp, fine point that does well on sheers and thin, slippery fabric.
  • Back stitching or using your machine's "fix" or "stop" functions at the beginning or end of a seam can pull a fine fabric into the throat plate. Instead of backstitching, sew to the end of the seam, leaving the needle down and raising the presser foot. Turn the fabric 180 degrees, lower the presser foot and stitch in the direction you came from. The result is the same as back stitching, but there's no pulling into the throat plate. I have absolutely no idea why this works.

Just turn and stitch in the opposite direction

Alright, enough for now. The jacket is just some hand stitching away from being finished. I'm planning to hand sew in the evenings this week so that I can wear this jacket to a birthday/Halloween do with some friends on Saturday. Stay tuned!

Thursday, October 18, 2012

BWTF!! Or Are We Now Yelling BS at Burda?

Warning: This morning I had to get up at what one of my friends dubbed "the ass crack of dawn". It is a darker and bleeker hour than the crack of dawn, where even the bright side is unlit.  You are forewarned.

Somehow yelling "BS!" when Burda Style messes up isn't as satisfying as yelling "BWTF!?!?" back when it was Burda World of Fashion.

Did anyone else receive this helpful email from the distributor of Burda Style in the US early this week?


We recently mailed the Burda Classics Fall/Winter 2012 issue to you. In the meantime the publishers informed us that sizes for some models are shown incorrectly in the magazine. Effected Models and correct sizes are:
  • Page 6, Modell 0005 A Burda sizes 34-48
  • Page 8, Modell 0007 B Burda sizes 36-50
  • Page 10, Modell 0004 A Burda sizes 36-50
  • Page 13, Modell 0006 A Burda sizes 34-44
  • Page 30, Modell 0004 B, Burda sizes 36-50
  • Page 31, Modell 0011 B, Burda sizes 34-44
  • Page 33, Modell 0014, Burda sizes 34 - 46
  • Page 33 + 35, Modell 0016, Burda sizes 34-46
  • Page 35, Modell 0015, Burda sizes 34-46
The Sewing Instructions are correct. We hope this helps.


This doesn't actually affect what is in the issue; they just misstated the pattern sizing.  I probably wouldn't complain, except that I found the whole Classics issue a bit disappointing to begin with. Both FehrTrade and Diary of A Sewing Fanatic reviewed the issue with very different points of view. My cranky complaint is there are only about 12 unique patterns in this slim issue and the rest of the "patterns" are just minor variations, like different hem and sleeve lengths, or different pocket options.

I wasn't quite over the $10 sting of the Burda Classic issue when I received another email, this time about Burda Style Creative.


This special issue will be published twice a year (first in Nov) and cost $20 for the 2 or $13 for just November from the US distributor. On the cover it says "From interior design to wrapping, from knitting to styling, from cool to comfy. Seasonal and timeless ideas so you can delight in feeling at home." This issue seems to be Christmas themed (ie: "create advent calendars", Christmas wreaths and decorations, seasonal needle crafts...).

I think I am going to pass on it.  I'm just not into crafts or home dec. But let me know if you get this issue since I am curious.

I think the next Burda Special issue ought to be one of my own invention: Burda Costume Disasters. It could come out for Halloween and would compile Burda costumes from over the years. AND there would be a whole section in it called Burda Edible.

"This children’s Tomato Costume is so dramatic and adorable. It will for sure have them enjoying vegetables." - BurdaStyle.com

You know you'd want in on the Burda Broccoli Sew Along. And just in case you decide not to buy the whole fictitious costume issue, you can download the broccoli pattern from Burdastyle.com, the US Burda site. (Seriously)  And it's free! Creative sewists could even turn the broccoli pattern into a bunch of asparagus with a simple modification to the headgear. 

OK, I just snorted water out my nose from making myself laugh about the broccoli. Overtired rant over. Back to our normally scheduled programming...

Wednesday, October 17, 2012

Sleeves, Solo: Arm Warmers Reveal!

It's turning out to be a very knitty week in the Craft Lounge. (Fear not, sewing friends, my jacket is coming along slowly but surely.)

While I was working on socks during my commute, I was simultaneously working on a pair of arm warmers while hanging out on the couch with Phin in the evenings. The socks were complicated and required presence of mind; the arm warmers could be knit with little thought - just knit, knit, knit. 

LOL - 80's big hair glamor shot. Hum a Whitesnake song for full effect.


I rarely wear long sleeves, and when I do I have a bad habit of stretching out the wrists by pushing the sleeves up to my elbows. Yet I'm the first person to reach for gloves in the winter, and at night I usually have a shrug or scarf wrapped around me for snuggley warmth. So, this was a bit of an experiment to see if I'd like sleeves that are unattached.


I love how long I made these.


I used this pattern by Phoenix Bess in a size M/S, but added 2-3 inches in length. Really, my arm warmers are just a tapered tube with a thumb hole and some ribbing. The yarn is a wonderfully warm and soft 80% merino, 20% cashmere blend, but it's bulky weight yarn, which is thick.


Action shot: Blogging with arm warmers!


Compared to my intricate lacework socks, which outclass any RTW socks in my sock drawer, I can't help but feel a bit "meh" about these. The stitches are so large and the pattern is so simple that I can't shake the feeling that they look home made. Where the socks were beautiful but didn't quite fit, these fit perfectly, but I don't love the pattern. That said, they feel wonderful on, so I've decided that they will be kept as lounge wear. This is good since I had a rough week at PT (another reason sewing has slowed) and am craving soft, warm comfort wear while I huddle in a ball.

This is really how I spent most of the evening: in a ball


Anyway, the upside of PT is that I am recovering and mostly back to life and hobbies as usual. So, here's a shout out to a fellow muse. My excellent friend Mar-Mar recently took up running after a 10 year, 2 child hiatus from the sport. On Saturday, we ran the Rock n Roll NY 10k in Prospect Park together - my first 10K while on the mend and her first one in 10 years. It was a great accomplishment for us. And what fun to run with a friend!


Me and Mar at the starting line

Just to underscore my point about the lack of sleeves in my wardrobe, my half zip pullover was taken off by mile two of this run to reveal a hot pink tank top underneath. If it's near 50 degrees, I run in a tank top.

Monday, October 15, 2012

Finished: Somewhat Victorious Victory Socks

I have very mixed feelings about my V for Victory socks, which I started back in August from a pattern in Toe Up Socks For Every Body.


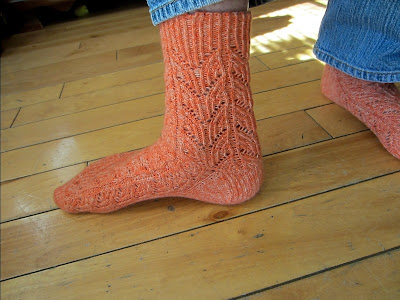
On the one hand, they are by far the best socks I've knit, in terms of my knitting skills and the end result. The lace pattern is really beautiful, I think. Plus I didn't make any mistakes while knitting, and the cashmere yarn is wonderfully soft and was easy to work with.

I enjoyed knitting from the toe up instead of from the cuff down, as I had done in the past. The method seemed to work out very well for me. The toe looks pretty great as far as I am concerned, and there was no kitchener stitch to do at the end. I always make mistakes with the kitchener stitch. 
 
Pretty "V" pattern and easy to make toe

Additionally, I liked making a banded heel instead of a short row heel. It was easy to knit and came together smoothly and without any holes, as happens with short rows.  Once I mastered the pattern, the second sock came together quickly and easily.


Best heel yet!
 
So, at this point, you are probably wondering why this wonderful pair of oh-so-soft cashmere socks - my best knit socks to date - are only somewhat victorious.

Ta Da!

Well, that's because this isn't me modeling them.

In the end, they didn't fit thru the ankle. So, I gave them to my skinny-ankled mom. Of course, I knew they didn't fit after the first sock was finished. Given the lace pattern, there really wasn't a way to make the ankle bigger without everything looking wonky. So, because I was enjoying the knitting, I decided to persist and that Mom Muse deserved some luxurious socks.

In truth, she seemed pretty tickled with them, which makes me happy. But there is a lesson for me when it comes to socks. Most sock patterns are sized for the width of the foot, and not for the width of the ankle. These socks fit me in the foot, but I'll have to consider whether a pattern can be made larger at the ankle before I start a toe up sock again.

Friday, October 12, 2012

Leather Jacket Lining: Peplum and Prepping

We're coming down the home stretch with my leather jacket!  I've decided to tackle lining the jacket in a few posts, both for clarity and because I've divided the process into a few distinct parts in my head. (Oh, and also because I'm not done yet.)

BurdaStyle's instructions for lining the leather jacket are not terrible for Burda, but nothing special either.  And there are a few problems, like the lining is left hanging free in the back. Free hanging lining is fine for trousers or skirts or a long coat with a deep hem, perhaps. But I can't really see how a free hanging lining would sit well at the curved pleated peplum on this jacket.

Really, Burda? How's that supposed to work?


Thankfully the two helpful reviews of this pattern on PR addressed the peplum and lining it. The peplum piece is very curved, which makes a deep hem - in leather - a bit unrealistic. So, at the start of this project I decided that the best solution would be to use the lining as a hem facing before doing anything else to the peplum.

I stitched leather and lining together at the hem (ws facing), trimmed the seam, flipped the lining to the inside, and then pressed to create a narrow seam.

Narrow hem using my lining as a facing
 
I basted the lining to the side seam allowances of the peplum and from that point on, treated it (leather and lining) as one, pressing in the pleats and sewing it to the other back pieces.This was done - but not blogged - quite some time ago. So, when it comes to lining, I'm going to have some hand stitching to do around the peplum. Also, this gives me an enormous hole to turn the lining thru - an unintended benefit!

Peplum sewn into the unlined jacket, raw lining edges showing

As I get ready to line, I also tidied up and prepped the insides of the leather. I found that the sleeve seam allowances kept flipping back into the sleeves rather than facing the body of the jacket.  Therefore, I ended up catch stitching them down to the back stay on the back side and to the hair canvas on the front, being careful not to stitch through the leather shell. I also tacked in shoulder pads.


SA catch stitched to hair canvas


The next step is basically a bagged lining, but there are some definite challenges because I made the mistake of following a few of Burda's instructions (oops!). Anyway, more to come.

Tuesday, October 9, 2012

Shibori: That's Japanese for Fun with Fabric and Fellow Bloggers!

Is there anything better than hanging out with other sewing bloggers while doing something involving fabric? I think not. Last night, I was invited, along with a few other NY-area sewing bloggers, to an intro to Shibori demo/class at the Textile Arts Center.  


Shibori

The invitation was courtesy of Course Horse, an online clearing house for all sorts of classes in the NY area that launched in 2011.

Full disclosure: Course Horse invited us for the low cost of "please blog about us and this class or we shall break your kneecaps". Although after meeting Evan and Katie, the masterminds behind inviting a bunch of fabric obsessed bloggers to a fabric dying event, I'm pretty sure that it was my inner monologue - who was raised in Brooklyn - and not either one of them that added the kneecaps threat. They were super nice fabric enablers. At any rate, I'm happy to blog about CH and TAC without any reservations since we bloggers totally made out like bandits. I got to take a free Shibori class while hanging out with Puu, Daughter Fish, Nettie and Ginger, talking about sewing and fabric and blogs.


R to L: Daughter Fish, Ginger, Addison, Nettie, Katie, Puu and moi (courtesy of Evan)
 
Course Horse, on the other hand, had to somehow figure out how to make it easy for all craft-obsessed, diy, athletic, overachiever-ish people in NY (and soon LA, too!) who want to take classes to actually find classes in, say, paddle boarding, weaving, mime, flamenco dancing, cupcake making, "BYOB painting", guitar lessons, sewing, photoshop, yoga, cooking, mah-jong, breastfeeding, sailing, jewelry making, creative writing or just about anything else that you could imagine. Seriously, I searched for mime and they had a class!  Talk about a great resource for those of us short on time and craft/interest obsessed! What I really like about them is that they pull together classes being taught by a variety of local craft shops and artists that I might not otherwise learn about.

Our Shibori teacher, Addison

Now, back to the class! In case you are not aware, Shibori, is basically what grown ups call tie-dye. It's a dyeing method that uses binding, folding and twisting to create resists that, after dyeing, become patterns. We used indigo as our dye, and that was fascinating, too. Indigo needs to be fermented in order to work, so the vat of dye smelled sort of like kimchee. So, you bind up your cloth (cotton, muslin, linen, silk...), wet it with water, dunk it in your navy blue kimchee for a few minutes, let it oxidize, rinse and then hang dry.


The fun part was the range of household items you can use as resists - popsicle sticks, buttons, mason jar lids, rubber bands...

This one is a spiderweb type shibori that I made using folds and thread. Essentially, you make a fabric cone and then loop thread around it repeatedly using what knitters would recognize as an m1 stitch. You can see the teeny tiny lines where the thread was the resist.


Kumo shibori aka Spider web shibori

TAC offers classes in all sorts of textile arts - fabric dyeing, weaving, sewing and printing - both in Brooklyn and Manhattan. In fact, they even offer a leather working class. Most of their courses seem to be in 4 class series and are taught by artists - "artists teaching atrists" was what Addison said. But even this one evening demo was enough to inspire me. I've never really considered dyeing at home before due to my messy nature and lack of knowledge. Anyway, I have a growing list of classes that I'm fantasizing about at the moment and I have a feeling that Course Horse will quickly become a lunchtime browsing habit. 

As for the other bloggers, it's really fun and inspiring to get a bunch of sewing enthusiasts together and the inevitable resource sharing and comparing notes that happens. And it was great to meet everyone! I hope to see you all again soon - in the blogosphere or in person!

Friday, October 5, 2012

Birthday Indulgence #1: Lingerie

Phin and I have an understanding that if we won Mega Millions or PowerBall, my first stop would be La Perla and there would be no questions asked about how much I'd spent. I've loved fun and pretty underwear since I first donned Bat Girl Underoos at age five.


How I loved my Underoos!


Not much has change in 32 years. I still feel like I have a secret super identity when I leave the house with pretties on under my clothes. So, K-line barely needed to write "Lingerie Shop Along" on her blog before I was online browsing. I need very little enticement. And since it's my birthday (all month long, as far as I'm concerned), I decided that a little indulgence was in order.

In addition to how much I love wearing pretty undies, having the right underpinnings can really make or break an outfit. I have some very basic basics that fill a special need, like t-shirt bras, racer backs, strapless, long line, etc. But I think where many women go wrong is not buying lingerie that is both pretty and can be worn under clothing. There are lots of brands that make beautiful and sexy lingerie that is very wearable on a daily basis. Some of my favorites are Chantelle, Aubade and Simone Perele. I wear a really wide range of brands (CK, DKNY, VS, B'tempted, Maidenform...) and I tend to mix and match tops and bottoms. I also wear camis and slips all winter long for added warmth and better lines. Dressing is more fun this way.

As far as fit goes, you already know my thoughts on getting fitted regularly and replacing worn out bras. Anyway, I did a little inventory check and came up with a shopping list. On to the shopping...

Let's start with a Bday treat! I decide to buy myself a bra and panty set just for fun from a new-to-me site: Fig Leaves. Look at these pretties that I scored on sale:

Passionata - $63 including shipping for bra and panties

This is also a new-to-me brand. So, I'm not sure that it will fit. But since Fig Leaves has a good return policy and only $5 shipping from the UK, I'm not too worried. It's already on it's way to me. I'm hoping that this is just as clothing friendly as it is pretty. It's basic black and I think it will be great under tops that have wider/portrait necklines, since the straps are wide set and the cut is low. 

Next, sleepwear! I love to sleep in either a pretty cami or bralette paired with my favorite pj bottoms. And a few of my camis recently got damaged/bleached by a skincare product I used. So, since they were having a 25% off Friends and Family sale, I went to my favorite US on-line retailer - Bare Necessities. Sadly, they only ship to US addresses, so apologies to all my non-US readers.

B'tempted by Wacoal - $28 for bra and 2 panties

But for those of us Stateside, they are a lot like Fig Leaves. They have a fantastic range of brands and sizes (28-60 band and A-N cup sizes) and offer everything from basic bras and panties to sexy lingerie, from swimwear to sleepwear, and also hosiery and socks. Since Phin has a ShopRunner membership, I also got free 2 day shipping.

Lastly, some basics. I replenished my basics pretty recently, but my racer back bras got a lot of wear this summer at a time when I was on steroids for my back injury (ie: a bit extra voluptuous). Racer backs tend to have a shorter lifespan than regular bras, anyway, because they close in the front and don't have multiple hook options as the bra stretches. So, right now, in my cart at Victoria's Secret are a black and a nude racer back bra.

Body By Victoria Racer Back Demi Bra - $45 each
I know what you are thinking. Yes, I have loads of issues with VS, too (not wide enough size range and too much padding/push up particularly on smaller sizes, all of which reinforces unrealistic beauty ideals, etc). But this bra fits me beautifully, and VS is the only lingerie company that I've found that has more than one shade of "nude". I tend to find the concept of "nude" as a color name to be a bit offensive. We're all different colors when nude. And I'm a pale - practically translucent - variety of nude. VS's "buff" color is light enough to actually be almost  "nude" on me and not show thru white clothing. Most beige bras do. Anyway, they will be purchased as soon as there is a sale and/or free shipping or something like that.

So that is my mini-haul of pretties. 

One last note on bras and breasts: October is National Breast Cancer Awareness Month in the US. So, be kind to your breasts and talk to your doctor about your risk, what screening options are right for you and living a breast-healthy lifestyle.

Have a great weekend, everyone! And thanks for hosting the shop along, K-line! It's always more fun to shop with a friend.

Wednesday, October 3, 2012

It's My Birthday! Pass the Cake!

Today I am 37 years old!!! Yay, birthday!!


Lunch = mini cupcakes which are disappearing rapidly


My day is off to a great start. There's already been calls and texts from many of the important people in my life. Phin is taking me out for dinner and drinks. Even the rain this morning couldn't dampen my mood - rain is just sunshine in liquid form as far as I'm concerned today.


I'm wearing my happy dress today!

Last weekend, I was reflecting on the last year of my life. Thirty six had ups and downs. I ran my first half marathon (yay!) and learned to knit (woo hoo!). But I also suffered my first age related medical issue - my stupid herniated disc (boo!).

About two months ago, I was really feeling frustrated and defeated. Pain will do that. My sewing mojo was nowhere to be found, I was just starting to take the first painful steps back to running and yoga, and I was feeling distracted and anxious in general, like everything in my life was on hold. Then I decided to cut myself some slack and give myself the space to heal. There are seasons for everything.

But now it's Autumn. My favorite month of the year - October! - is here again, and I'm feeling that same burst of creativity and positivity that I do each year. I'm well on the road to recovery, despite some set backs. My leather jacket is nearly done, I've got a list of baking projects to work through, and my running strength and stamina are returning one mile at a time. I'm rebuilding - a little stronger, a little wiser, a little more patient with myself. Today I feel resilient - a quality that I hope will follow me through whatever changes and challenges life has in store.


Because I like to celebrate all October long, I've decided that my birthday month project will be for the times when I want to take things a bit slower and pamper myself. So, I'm planning on making a kimono robe. That way, when I do find myself needing to take time for healing or lounging or just giving myself a break from the self-imposed rigors of my hobbies, I'll be able to wrap up in something beautiful and luxurious that I've made for myself.


Burdastyle 07/2011-124 - Kimono robe


 I may also get around to sewing up my vintage slip pattern, too. (Oh! And I'm participating in K-Line's Virtual Lingerie Shop Along. 'Cause, I have a weakness for lingerie... and at my age a girl needs some support... and it is my birthday after all... more on this on Friday.) 

Won't I be luxurious as I convalesce?

Most of all, I'm looking forward to 37. I think it will be a fun and exciting year for me. Thanks for following my journey!


All gone!

Tuesday, October 2, 2012

Oh, Look! Sleeves.


Look! Look! The sleeves are in! And they are both set in as perfectly as I've ever set in a sleeve!  No accidental pleats or unintentional gathers. Woot!

Since a few people mentioned that they had never heard of leather tape before, I thought I'd provide a bit more info.  I bought on line at Wawak (click here). It comes in a 60 yard roll in two different widths - 1/2" and 1/4". Here's the description from the website:
High performance high tack double sided seam tape for leather and vinyl hemming. Allows for superior bonding and conformability to irregular as well as flat surfaces such as plastics, metal profile extrusions, decorative trim, and is also used as a universal all purpose double coated tape.
That's it. It's just really sticky double sided tape that you can use to glue down seam allowances. Peel from the roll, stick the sticky side down, peel off the backing on the other side and smoosh down the seam.


Next step: shell + lining = finished jacket.

Monday, October 1, 2012

Q: How Do You Set In A Leather Sleeve?

A: Very, very carefully.

One sleeve "pinned" in, one sleeve ready to go.


Leather jacket production is finally back in full swing. Yay.  I spent a chunk of time yesterday reviewing where the project stood, what the next steps are and tidying up a few loose ends.

There were a few seams that needed top stitching before I went any further. Plus, those that were not going to get top stitched - like the sleeves - needed to be finished with leather tape.


Leather tape is essentially very very sticky double sided tape that you use to glue down the seams.  I know that other sewists have reported good results using glue applied with a q-tip. But, since I was the kind of kid whose art projects generally left debris, I decided that the tape was a better option for me. It was easy to use and carried less risk of gluing myself to the project or the project to itself or my fingers together. That said, my early experiments with leather tape taught me NOT to tape and then top stitch the same seam. Do one or the other, but not both. The tape adhesive will seriously gunk up your needle.

After that it was on to setting in the sleeves. And let me tell you, leather does not "ease" so well. It took several tries, tons of binder clips and lots of finagling to get the sleeve in in a way that I think - once sewn - will not cause any pleats or folds and will hang smoothly from the shoulder.

Ridonculous number of binder clips.

Honestly, there really isn't a good way to do a do-over with the sleeves. I'm hopeful that the care I took will lead to near perfect results on the first try. I plan on sewing this one and then moving on to the second sleeve tonight. (Fingers crossed.)

There really won't be much left to do after that: just putting in the lining and some finishing touches. I'm glad to be coming down the home stretch on this project just in time to be wearing it.