Saturday, March 31, 2012

The 5 Day Forecast: Sunny and Warm

Well, it's after 3pm and I'm still in pj's. No sewing or baking or anything in the least bit productive has happened today. Work in Montreal was more intense than expected which meant that no fabric shopping happened. And I have not had a chance to photograph the latest chapter in my leather jacket saga. So, I can't really update you on that either. But that's ok. C'est la vie.  Sometimes you just need a day to loaf around the house, unshowered and aimless.

There's a lot going on and my mental forecast is all blue skies. Phin and I may spend some time in a warmer climate later this year (more on this if it happens), and with all the warm weather we've been having lately I can't stop thinking about the summer sewing I'd like to do. So, while away from the Craft Lounge, I did what all obsessed sewists do; I dreamed of (and shopped for) a fantasy summer wardrobe project.  

This was spurred on by a BMV members pattern sale (naturally).
 
V8800 shirt for Phin, V8725 sundress,  M6569 bathing suit and B5749 knit dress for me

 
DKNY knit pieces - V1280, V1235 and V1282
It's funny that all the DKNY pieces are grey, which is not a color I wear often. In my head these are all in summery blues and turquoise. All of these would be great travel pieces.

Once I splurged on these patterns I began thinking about what I had in my stash. And here's the funny thing:  what my stash says about me is that I love summer sewing. Apparently, I long for white trousers:

L to R: White bottom weight linen (AK Fabrics), cotton (Calvin Klein from FabricMart) and cotton/poly blend (MetroTextiles).

And I wish I had more time to make fun patterned pants, like the BurdaStyle 6/2011-114 flowered border print pants that I made last year.


L to R: Flower print cotton, border print cotton and seersucker (all MetroTextiles)


I long to make loose sheer drapey tops from chiffon and charmuese...

L to R: blue and turquoise chiffons (Elliott Berman), striped charmeuse (Michael Levine) and orange polished cotton (Anne Klein from FabricMart)


...from patterns like BurdaStyle 4/2012- 111.


I would have all kinds of sheaths and sundresses, mostly in shades of orange.


L to R: tangerine pinstriped denim, Anne Klein lightweight damask, stretch cotton poly floral and Calvin Klein cotton sateen stripes (all from FabricMart)

And I top it all with some cute knit wraps or shrugs...

L to R: teal, turquoise and black rayon jersey knits (MetroTextiles)

 Like BurdaStyle 3/2012-121.


I could go on about all the summer clothing I would sew.  But what about you? What does your fantasy sewing look like vs what you have in your stash? Does your stash have as strong a point of view as mine? Do tell!

OK, for me it's now back to reality.  I swear to you that I have some good sewing posts - where I've actually sewn something - coming up. In fact, here is a sneak peek at a warm weather project I did when I needed a little break from my leather jacket muslin. 


It was rather cold that day and when we finished photographing I wrapped up in my beach blanket. he he he So at the moment you'll just have to guess at what's underneath all that terrycloth. So, please keep checking back. It's blue skies and happy sewing ahead. 

Wednesday, March 28, 2012

Mac + Cheese: Molto Italiano Edition!

So, here I am in Montreal, the city that inspired my quest for the perfect mac+cheese two years ago. I haven't posted a new mac + cheese recipe in aeons, and I have not yet succeeded in finding that perfect recipe.  That's partly because Phin, who can only take a little cheese, basically begged for mercy.  So, I was totally surprised recently when he announced that he would be making  mac+cheese while I was busy sewing.


The recipe that he picked out, Mario Batali's Ziti al Telefono, is really the love child of the classic Italian-American baked ziti and a mac + cheese. What's not to love? Why it's "al telefono" is a mystery to me. Maybe because it's so good you want to call your friends and gloat. Who knows?

What's unique about this recipe when seen from the ziti point of view is that you make a Bechamel (besciamella) sauce for it.


What's unique when seen from the mac + cheese side of things is that you make a basic tomato sauce for it.


Then you basically blend the two together, add a bunch of mozzarella and bake it until bubbly, like both ziti and mac+cheese.


We also added some meatballs and sausage (Phin is a carnivore at heart.)


Top with some cheese and bake until bubbly. 


And then you tuck in to a big warm bowl of the stuff. I have to say, this was definitely the best ziti I've ever eaten. It was creamy and rich without being too heavy and cheesy. It definitely wasn't a classic mac + cheese, but it absolutely satisfied that craving for warm cheesy goodness.


So, consider this your call to try this recipe

I'm hoping to get a bit of fabric shopping tomorrow if work permits. Stay tuned! 

Monday, March 26, 2012

San Francisco - A Sewist's Town!

Sorry for the radio silence while I was in San Francisco! Even though I wasn't blogging, sewing was on my mind from the moment I got of the airplane at San Francisco International Airport. In just a few steps, I found myself face to face with a vintage Singer sewing machine!


The museum at the airport has mounted an exhibit called Threading the Needle: Sewing in the Machine Age. It's got any number of beautiful early sewing machines, notions, advertisements, 1/4 size dress forms and a beautiful example of a dress sewn with some of the earliest home sewing machines.

Somehow this puts my sewing efforts to shame.

By the time I made it to baggage claim, I was already in a fabric frame of mind.

My first fabric opportunity cropped up pretty quickly when I realized that Britex was just blocks from my hotel. So within minutes of checking in, I was browsing it's very well organized 4 floors - sumptuous wool and silk on 1; exquisite cotton, poly and rayon on 2; just about every kind of notion you can imagine, plus trims, patterns and some sewing books on 3; and faux fur, vinly, and sale on 4.  I really thought I'd hit the jackpot with the sale section until I realized that the 1 yard remnant of (the most gorgeous and buttery soft) silk that I immediately picked up cost $99. On clearance. Yeah, talk about a downer.

Wool and Silk on the first floor

Overall, there was little to buy that was less than $20/yd, and most was more than that. Now don't get me wrong, all of the fabrics were luscious. But just not in my price range. At one point, I flirted with some orange wool/viscose/poly that was in a small area of 50% off wools, but decided that for $12.50, I could find something I was happier with at home. Some have compared Britex to Mood, but I think it's much more like Rosen & Chaddick or NY Elegant Fabrics - it's where you go when working on something special and cost is not an obstacle. This is not the kind of place that I would buy basics at or really buy anything at all at unless I knew what I was sewing and what yardage I needed. So, I left empty handed. Oh well! 

My second fabric shopping adventure happened on my last day in town after my business was concluded. I headed out toward Golden Gate Park to hit two fabric stores and then drop in on the de Young Museum.


Satin Moon Fabrics

First, I stopped by Satin Moon. It's a small shop, but with very high quality fabrics. Again, there's not too much at less than $20/yd. But if you are interested in beautiful fabric and open to what may suggest itself, this is a great place to shop. They have a well curated selection of beauties at the ready. While I was there a decorator was buying home dec fabric for upholstering a couch for a client and another sewist bought some Ponte Roma knit (which was $18/yard, I think). But after some browsing, I moved on.

My second stop was down the street to Fabrix. This was more my speed. Fabrix is stocked with yards of discount fabric, including a whole table of $.99/yd bolts. A few weeks ago, Mikhaela over at Polka Dot Overload posted a few times about sewing with cheap fabric, and I'm pleased to say I have truly jumped on the cheapo bandwagon with this white burnout which feels very soft (like rayon, but I could be wrong). 

$2 for 2 yards


The final tease with San Francisco was the de Young Museum which was opening an exhibit, The Fashion World of Jean Paul Gaultier: From Sidewalk to Catwalk just 2 days after I left! How unfair is that!?!?!? Doesn't it look phenominal? Oh well. 


Anyway, at this point my time in SF was at an end. But it was fun to indulge in some fabric pawing in a new city. This week it is Montreal for me and hopefully more fabric pawing. Also, I've got some updates on my leather jacket project to post later this week - there's been some setbacks which just adds to the adventure. Stay tuned.

Saturday, March 17, 2012

Happy St Paddy's Day: My Pop's Irish Soda Bread

Aside from having blue eyes and freckles, one of the best things about being Irish-American is St Patrick's Day. And let's face it, the Irish are such good merry-makers, that we've opened our holiday to all-comers: Everyone's Irish on St Patrick's Day!


So, this year I decided to celebrate this greenest of days by making a loaf of my Pop's soda bread. From what I understand, my dad's recipe is a bit more traditional. Most of the Irish Soda Bread that you see in the US at this time of year is much more cake-like than bread-like - sweet and with a fine cakey crumb. But my dad's recipe actually produces a very lightly sweetened, somewhat crumbly bread. I think of it as the health-conscious cousin of a scone. It's perfect to enjoy lightly buttered with a cup of tea.


 Pop's Irish Soda Bread
2 c flour
2 Tbsp sugar
2 tsp baking powder
1 tsp baking soda
1 tsp salt
3 Tbsp softened butter
1 c buttermilk (or 1c milk + 1 Tbsp vinegar)
1/2-1c raisins (depending on how raisin-y you like it)
1 Tbsp caraway seeds (optional)

Preheat oven to 375. Sift first 5 ingredients into a bowl. Cut in the butter (by hand or in mixer). Stir in raisins and seeds. Gradually stir in the buttermilk until the flour is wet. The dough should be soft and a bit sticky. Turn out onto a floured board or counter.


Knead until smooth, sprinkling with additional flour if necessary. Form into a round disc about 8" across. Place onto a greased cookie sheet. Cut a cross into the dough.


Bake for 40 min until center is dry and loaf sounds hollow when tapped. Brush with melted butter if you want to give loaf a nice shine.


I should add that you can leave out the caraway seeds (like I did) if you're not crazy about them. I also used white whole wheat flour for about 1/3 of the called for flour.

So, whether you are Irish by birth or just by mirth, here's hoping that your beer is green today! Erin go bragh, peeps!!

Friday, March 16, 2012

More Work Travel = More Fabric Shopping?

Work travel is not always fun. But fabric shopping is!

Business trips will bring me to San Francisco and Montreal in the next two weeks. If you are in either location and want to meet up for some fabric shopping, give me a holler at clio[dot]phineas[at]gmail[dot]com!  Or if you have any suggestions on fabric and notions stores in either place, let me know!!

Happy Friday, everyone!

Thursday, March 15, 2012

Leather Jacket Muslin 1.0: Sleeves

As I mentioned on Monday, I worked on fitting muslin 1.0 on and off throughout the weekend.

On Saturday, I fine tuned the bodice fit. (Tanit-Isis, you were right! After a small FBA, things were looking good). Then, on Sunday, the sleeve drama began. I've only recently realized that the reason I own and sew so many sleeveless garments is that most sleeves don't fit me well as they are constructed and I am built. And I really have to labor on them every time I sew them.  Here was my first attempt. 


Let me tell you that these sleeves were not at all comfortable. They may look okay, but they were very binding when I raised my arm at all. Plus there was a lot of extra fabric in the sleeve cap and at the back of the sleeve, both at the cap and through the triceps all the way down to the wrist. Really, it seemed like there was too much fabric where I didn't need it and not enough where I did. At one point I even checked to make sure I'd  put the sleeve in the right way.  I had.

But by the end of the weekend, they looked like this.


Kinda looks that same, doesn't it? But the difference is immeasurable. This sleeve is comfy and I can actually move my arm without it binding and constricting. I think the noticeable difference is how the sleeve cap fits into the seam at the shoulder much better and the loads of fabric at the triceps has mostly been eliminated. But otherwise, I don't think the pictures show much difference, despite pretty significant alterations to the sleeve and armscye.

Here's what I did:

First, I lowered the sleeve cap by about 1/2 inch so there was not nearly as much ease. In addition to not needing the extra height in the sleeve cap since it caused bagging, leather does not ease well. So, I wanted the sleeve to fit pretty precisely into the armscye without having to gather and ease it in. 

Second, a forward shoulder adjustment was needed. I used the instructions in Tailoring: The Classic Guide to Sewing the Perfect Jacket, and also consulted FFRP and Fitting and Pattern Alteration: A Multi-Method Approach. They basically all agreed on method..

Third - apologies for not having Phin photograph me from the front -  I made the armscye higher and tighter by about 1/2 inch at the armpit, tapering up to the cap. Not only does this help with mobility, but it was recommended for leather, which will stretch to your body, as I mentioned on Tuesday.

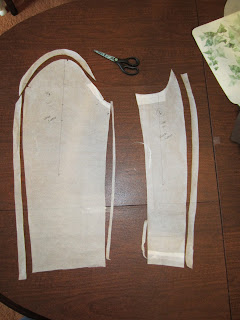
Fourth, I narrowed the sleeve by 1 inch at the wrist, tapering to 1/4 inch where it connects to the armscye. Here's what the alterations to the sleeve pieces looked like.


It seems counter-intuitive, but a smaller sleeve sewn into a smaller armscye allows for a much greater freedom of motion.

A little more tweaking happened after the photos and then I cut into the faux leather. And let me tell you, I'm glad I opted for two rounds of muslin because I've already sewn the zipper in wrong. Three times. (oopsy!)

Next up on the leather jacket front: sewing on faux leather!

Tuesday, March 13, 2012

Leather: Tools and Tips Part One

So, it's about 6pm and I'm sitting on the back porch with a glass of wine, chatting with Phin and blogging. When it's 70 degrees and sunny in March, it's hard to stay in the Craft Lounge sewing a leather jacket. BUT I did make good progress this weekend.

Tools
I finished with muslin 1.0 on Monday morning (more on this later in the week) and moved on to transferring all the changes back to the pattern. This morning I was about half way thru cutting the icky faux leather for muslin 2.0 when UPS showed up with my new Olfa Rotary Cutter and 2' x 3' cutting mat, along with a bunch of other leather sewing supplies.  

Rotary cutter, leather needles and 1/2" and 1/4" leather tape

I was so excited I tried the cutter immediately.  I normally look at cutting as a necessary evil in order to get to the sewing tasks that I like, but the rotary cutter was so quick and precise that it glided through 2 layers of faux leather like butter, making cutting a breeze.


Not to mention that using pattern weights is easier and quicker than pinning. I was worried that the cutter would be difficult to use or get the hang of, but it was not hard at all and I felt like I had as much control than with sheers.

The verdict: having cut half of the faux leather with sheers and the other with the rotary cutter, the cutter wins. No contest! If I can help it, I will never cut with sheers again. There are probably some things that sheers are better for, like very small pieces and making notches. But if you are cutting with sheers and thinking about a rotary cutter, I say go for it. My first impression is that it's a great tool.


Book Review
Over the weekend I also read Sewing with Leather & Suede by Sandy Scrivano. 


Despite the fashions showcased in this book being tragically out-of-date (this 1998 edition looks more circa 1988 to me), it was a great buy. It has an impressive amount of detailed information about everything to do with sewing leather and suede. It answered several questions that I had including how much of a seam allowance is appropriate (1/2"-5/8" generally), appropriate interfacings (in short, there are lots of options), different seam treatments for leather (which were well photographed, I thought), different tools to work with, how to shop for leather, how to lay out your pattern and cut... the list goes on.

The book also had thorough instructions for lining a leather jacket. Given that I'm working with Burda  instructions, this was pay dirt. Additionally, it talked about how leather behaves in general, but then added specifics throughout. For example, because leather will stretch and conform to your body when you first wear it, it suggested making the armscye and sleeve higher and tighter than you might make it in other fabrics. I found this immeasurably helpful guidance while working out the sleeve of my muslin. (More on this later in the week!)

The verdict: this book may not inspire, but it will teach you how to sew leather. So, a big win in my book. Anyway, Sewing with Leather & Suede was updated in 2001, but I settled on the 1998 edition mostly because of cost (the 2001 was $50+ on Amazon). I bought mine from Half for $15 from a book dealer I had previous experience with. Honestly, a lot of the information in this book can be found on blogs, but not in this depth or all in one place. This is a great reference to answer all your questions about working with leather.   


Anyway, more on muslins 1.0 and 2.0 later this week! 

Friday, March 9, 2012

TGIF: Weekend Sewing Plans!

Some weeks go very smoothly with my sewing and knitting and baking and such. Others don't. An intensely busy week at work basically left me with little time and less energy for my extracurricular pursuits. Today was the only day that I even got to take a walk in the Garment District.

However, I'm taking Monday and Tuesday off, and so I have big plans for this long weekend!  Here's the short list:

First: Working on my leather jacket muslin. I'm optimistic that muslin 1.0 will be in good shape soon and I can move on to muslin 2.0, which will be in a yicky faux leather only rivaled in hideousness by the awful camo and rose denim of it's predecessor. 


In person, the distressed areas are fake-tan orange.


Second: Some educational reading. Don't let the zebra print on the cover fool you; this book's styles are tragically out of date. But a first glance makes me think the techniques and technical info is sound.

Where did people buy OOP books before Half.com?
Last: Assembling supplies. I've actually already started this and have leather glue, leather needles, zippers and other notions at the ready for testing. I'm thinking this might be the right time to buy a rotary cutter and mat.

Do you have big weekend sewing or other crafty plans? What are you working on? 

Happy Friday, everyone!

Monday, March 5, 2012

Leather Jacket Muslin 1.0

I'd like to say I had spent all weekend sewing, but that would be a gross exaggeration. I arrived home from LA like an exhausted starlet and proceeded to loaf around the house all weekend. The only sewing to mention was that muslin 1.0 for my leather jacket (Burda 07-2010-118/119) is looking pretty good, so an accomplishment despite my best efforts at being lazy.

Front: very not bad

I'm basically happy with how the lapels and front are fitting. I think leather will be a bit bulkier than the denim muslin. So I'll probably let things out just a skootch so I have some extra ease. Honestly, this jacket needs to be pretty fitted to look good, but I don't want it skin tight.

The side view shows a little bit of wrinkling from the bust to the hip, which I didn't notice while on, but will investigate. I have room to let out the princess seam at the bust if needed.

Side: A few drag lines from bust to peplum

As for the back, I tested out both with and without the peplum. Peplum wins. And the back needs to be taken in a bit at the shoulder blades, which is normal for me. I've noticed that the drag lines from the bust seem to extend around to the peplum. So, I'm wondering if the solution might be just to let that seam out a little bit.


Back: The peplum is cute, despite looking like a Thanksgiving decoration in brown.

The only other alteration that is truly evident to me at this point is that I need to lengthen the jacket by 1-2" since the waist is currently above my waistline. Perhaps it needs a little length at the hem. I didn't press or pin up the hemline, so in the pictures you are looking at the unhemmed length.

You've probably noticed that my muslin has no sleeves. Because the fit of the bodice affects the fit of the sleeve, it's a waste of time to set in a sleeve before you've really worked out how the bodice should fit both across the front and back. So, this was quite deliberate and not just a symptom of my lazy weekend.

Anyway, stay tuned. Sleeves are next and then I have some truly ugly faux leather to do a more refined muslin, testing out how I plan to sew on the actual leather. Organizing supplies and buying leather are also in the near future. 

Friday, March 2, 2012

That Oonaballoona is One Bad Influence!!

So there I was in LA, sitting on top of my suitcase, trying to jam one last piece of fabric into it and thinking two things:

First: there are definitely moments when having a curvy bottom to help close a suitcase is a very good thing.

Second and more important: I must warn you all that Oonaballoona is a fabric enabler, temptress and bad influence of the first order! Not only will she take advantage of your personal fabric buying weakness, preying on my your love of orange, but she also has a talent for zoning in on the best deals in the store, making it impossible for you to say no.

While in town, I unwittingly agreed to meet up to peruse the LA branch of Mood. Perhaps I should have been suspicious when she suggested we meet for a sweet to fortify us for the shopping, but I'm a trusting person by nature and thought I would just browse a bit. However, Oona had other plans. Shortly after picking out the most gorgeous fabric in all of Mood (seriously, check out the Anna Sui panel she scored), she suggested - all big eyes and innocence - that we check out the remnant bins. It was downhill from there.

Four coordinated pieces of blue and green home dec fabric and a fabulous green and purple wool remnant

And if that wasn't enough, she offered to share - share! - two pieces of fabric she picked out with me! And somehow I found myself agreeing that it would be incredibly fun to both make something from our halves of this stripped orange knit and blog about it (stay tuned). Can you imagine?


My half of the shared fabric


Now, you'd think I would have learned my lesson, but at the end of our shopping at Mood, I somehow  found myself agreeing to meet up again to hit some other places the next day. I summoned all my will power and reminded myself of the limitations of my suitcase, but I truly underestimated that crafty and devious Oona. This time she brought backup!


Me, Oona and local sewista, Leah

Local sewista, Leah, took us to Michael Levine and pointed us to the discount loft, where they sell remnants for $2.50 per pound. Yes, you read that correctly $2.50 = 1 lb of fabric.

Between all the pawing over fabric and conversation about sewing, they managed to weaken my will power and I scored was pressured into buying these sweet pieces:

Black burnout jersey and orangey striped chiffon!

What could I do, I was outnumbered?  But I distracted Oona with a beautiful piece of organza and made a break for it, making some excuse about being on a business trip and having somewhere to be, blah, blah, blah. And with that, I left Oona and Leah before I got roped into any more fabric adventures.

So, consider yourself warned. Do not fabric shop with that fabulous and Oon-tastic woman from Kalkatroona unless you have an empty suitcase to hold all your gorgeous finds! I, for one, will definitely not be letting her know that I might end up back in LA for another business trip this May.

Oh, one last thing: It's come to my attention that there is a rumor that I'm the one who enabled Oona's spectacular haul, particularly the Anna Sui piece. In my defense, the poor gal left her stash in NY but has a poolside sewing patio, a featherweight and a sweet Ruggy, who seems to have been cut from a similar cloth as my Phin and brings her drinks while she sews. So, my so-called "enabling" was really just an act of compassion toward a fellow sewista far from home without her stash. That is my story and I'm sticking to it!

Happy Friday Everyone!