Friday, April 30, 2010

Guest Blogger: Terpischore

Well, it is Friday evening in London and I am finished with work and waiting for Phineas to arrive so our vacation can begin - London, Athens and then Venice. His flight landed an hour ago and I am tap tap tapping my foot.

However, while I am out enjoying some of Europe's most vibrant cities, I have left you in good hands. For those who are new to my blog, I have 4 sisters, and for blogging purposes, I refer to them as
the Muses. The are tremendously talented, absolutely brilliant, fun and beautiful. They influence and inspire me in so many ways. Anyway, today I leave you with Terpischore, who is craftier than she would like you to believe. In fact, I am feeling rather jealous of this project, which I donated a scrap of fabric to... Here she is...


Terpischore's Jewelry Board Project

Thanks, Clio. Here I go...

After a recent afternoon spent untangling the necklaces in my jewelry box yet again, I decided I needed to find a better way to keep my jewelry organized. I got the idea for this project from a post I saw on Design*Sponge a few months back. I am not a particularly crafty person however I thought this sounded easy enough and it was!

I found this old wooden picture frame at the Brooklyn Flea one afternoon while browsing for antiques and thought it would do the trick. With a little white spray paint, an old cork board, a bit of ribbon and some fabric, generously donated by Clio, I set about making my jewelry board.

The process was fairly easy; I started by measuring the cork board and using a straight razor to cut it to size. The unseasonably warm day gave me the opportunity to paint the frame. Having never used spray paint before I had a lot of fun spraying away! The frame took 2 coats to cover the forest green paint underneath. Once dry (24hrs. later), I attached the fabric to the cork with regular staples and the ribbon to the frame using a staple gun.

Fully loaded: seriously, doesn't this
Muse have
a great collection of necklaces?

I am really happy with the way my little project turned out. There are a couple of things I would do differently next time. Although, I like the shape I think next time I would use a larger frame. I didn’t realize how many necklaces I actually have! I love being able to see all of my necklaces and I think next time I would add a piece of fishing line strung across the board to hang earrings on.

Thanks, Clio, for donating your scraps!

Tuesday, April 27, 2010

Review and Final Thoughts: Christening Ensemble

This is exactly how I feel, too!

Have you ever come to the end of a project and been absolutely exhausted but totally satisfied? If you have, then you can relate to how I feel right now.

I've been living and breathing this project for the last few weeks, to the detriment of my other hobbies. However, it was well worth it. There is nothing more I could have done to make this Christening ensemble more beautiful, inside or out. Here is a review, in pictures and a few words.

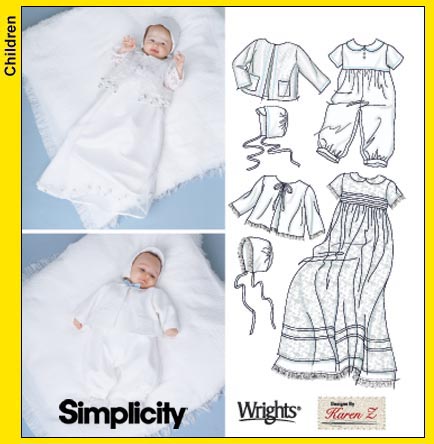
Simplicity 5813

I am most proud of how the top came out. The cummerbund hides snap tape that attaches to the waist of the bottoms or to the skirt. This was one of the alterations that my sister, Poly, wanted to make so that the outfit would be appropriate for her son and also any daughters that she may have in the future.


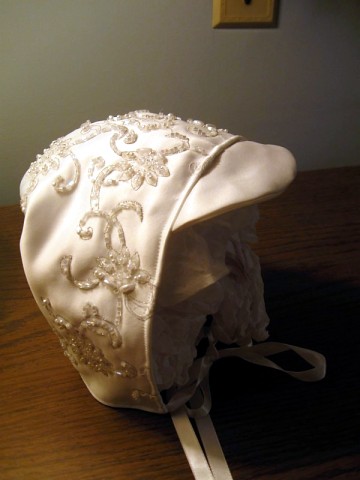
The bonnet was a very cute extra. Not only was it a bit boyish thanks to the brim, but it allowed us to use a beautiful beaded motif that would have otherwise been scrapped.


What can I say about the booties? The fact that they are teeny tiny only adds to their charm. The booties were the only item that we made from Simplicity 2457 rather than 5813. They looked absolutely princely. Really, I'm feeling like I ought to make a grown up size version for myself. Wouldn't you feel pampered in slippers like these?

My sister primarily worked on the skirt piece and the jacket from Simplicity 5813. Although she is a beginner sewist, she did an absolutely spectacular job. Here is the skirt and jacket. I was thrilled that we were able to use the beading to such great advantage. I am hoping she will do a guest post for me on the ups and downs of making these pieces.

Front of the skirt and jacket.


Back of the skirt and jacket.

I love that we were able t use the trim from the wedding gown as the hem of the skirt and as the cuffs of the jacket. It took A LOT of hand sewing for the jacket to be completed.

Here are a few pictures of us hard at work sewing.... (note how svelte yours truly looks thanks to the strategic placement of the iron and ironing board...he he he)


It was so much fun to sew with my sister. And I am so very happy that she include me in such a beautiful and meaningful project.

Sunday, April 25, 2010

Liberty London

So, I made it to London. Huzzah! My flight was slightly delayed, but there was not a volcanic ash cloud in sight. It was smooth flying.


Yesterday, I ended up spending much of the afternoon with a friend/colleague rather than spending the day on my own. So, I didn't get to fabric shop as I had planned. However, I did hit Liberty of London.

Liberty is rather impressive. And expensive.

Liberty is full of designer duds, accessories and lingerie co-mingled with fabric and yarn, and all laid out in a beautiful building right off of Carnaby Street.


Liberty's fabric area is rather smaller than I expected, but it had a selection of their cottons, fabrics by Amy Butler, buttons and trims, and - as I mentioned - an array of colorful yarns for those who like to knit.


Their fabrics are mostly floral prints (meh - I'm rather indifferent to 'em). However, I did like the above peacock feather print. But at GBP19.95/meter (that is about $30/yard) it was a bit rich for my taste. So, sadly, I left empty handed.

However, later this week I plan to hit a few other places including The Cloth House and McCulloch & Wallis. I will report back to you then.

Thursday, April 22, 2010

Travels and Travails

Thanks to the Boston Globe for this gorgeous shot.

As you read this, I am (hopefully) en route to London. Needless to say, the volcano in Iceland has thrown some kinks into my week! One (postive) thing that has happened is that the work-related events I was supposed to attend on Saturday have been cancelled. So, yours truly will have a whole day free in London to sightsee shop for fabric.

Speaking of shopping for fabric in foreign cities, sew-istas in Toronto have it pretty darn good! Since I was in Toronto last week for work, I decided to hit their garment district. I had an excellent local guide and new sewing friend. (Thanks again, Reethi! It was so much fun shopping with you and I am very seriously considering your kind offer to feed my fabric mania with that gorgeous satin).

Wow, I didn't realize how bad my cell phone camera is!
Here we are at Downtown Fabric.


We hit a bunch of places on Queen Street W, but most notable were LA Fabrics and Downtown Fabric. LA had only the best of everything at not-unreasonable prices. They had a bevy of succulent wools and wool/cashmere blends, satins, and cottons from Liberty of London (I resisted for obvious reasons), plus a good selection of bridal trims and basics. At Downtown, Reethi scored some to-die- for Italian satin in a stunning large floral print which is destined to become a summer dress. It will be divine. Oddly enough, Downtown felt like home. The owner must be related to Kashi of Metro Textiles. He definitely knew how to sell. In fact, I am having non-buyers remorse. There was a gorgeous satin in a rose print that I was digging. I have no idea why I didn't get it and am regretting the decision.

Anyway, I am away for 1 1/2 weeks in London and then a 1 week mystery vacation that Phineas is planning. (I'll let you know when I know!) But fear not, I have a few posts planned and a few guest bloggers lined up. So there will definitely be posts while I am away. Have fun while I am gone!

Monday, April 19, 2010

Christening Ensemble!


My nephew, Little C was christened on Saturday and his ensemble looked gorgeous and fit beautifully! It was a very nice day with family, and I was so happy to have played a special role and help my sister with this project. Here are a few shots...

Here he is in the bodice and skirt:

I love how cute the buttons on the front look

Here is a shot with 2 of his aunts, wearing the bonnet:

Mom (Poly), Erato, Little C and Terpischore


And here is after the change to the romper bottoms, which you really can't see all that well.

Aunt Terpischore and cousin Pedro

Isn't my nephew, Little C, the sweetest thing? I am sure it was overwhelming, but he barely made a peep and was his usual smiley self.

I'll post a full review of the pattern and our alterations later in the week. Stay tuned...

Thursday, April 15, 2010

Nearly finished bodice...

Here is a preview of the bodice piece of the Christening Ensemble.


Last night, while hanging around my hotel room, I stitched three little satin covered buttons down the front (not pictured) and began re-beading the trim where it had bald spots. My favorite feature of this piece of the ensemble is the cummerbund. It was made from the trim at the hem of the wedding gown. It hides the snap tape where the bodice will attache to either the pants or skirt.

When my sister, Poly, began reattaching the beads on the pieces she was working on, she had trouble with the needle size. Some of the beads have very tiny holes. However, I bought needles especially for beading and it seems to have been a good move.

These needles are very long and narrow - so narrow that I had to coat my thread with Thread Heaven in order to get it through the eye of the needle. (Oh! If you are not currently using Thread Heaven when you hand sew, you need to check it out. Today. Seriously. I love the stuff.) The beading needles are also oddly flexible - springy, even. However, they made the job much easier. And, since this is the first time I am beading anything, that is very very good!

Wednesday, April 14, 2010

Booties and bonnett preview...

Aren't these sweet?

Booties fit for a prince

I love the cute little brim of the bonnet. It makes it a little more boyish.

Right now, the project is mostly done, except for some hand sewing which I have brought with me on my trip to Toronto. There are a few seams that need to be slip stitched and some of the beads need to be sewn back on. I removed many beads around the seams and some additional ones fell off of their own accord. I'm sure I will be finding beads in the crafts lounge for weeks.