Thursday, December 8, 2016

Wadder I Care?

So, today I am serving up a wadder.


To boot, it is poorly photographed. This somehow seems appropriate for the gray weather this week.

I don't have many wadders in general, and my last few have all been fabric fails, rather than sewing fails. So, I'm feeling like I need to explore what went wrong with this BurdaStyle 08-2016 #103 flounce blouse, since my pretty swiss dot fabric is not to blame. 


I have a few RTW blouses that are very similar, at least from the front. Also, I find that Burda's sizing and drafting is very consistent - the fit is predictable on me. I picked my size based on my high bust and made only one change to the pattern, an FBA. And so I was generally optimistic that this would be reasonably successful.

Alas.


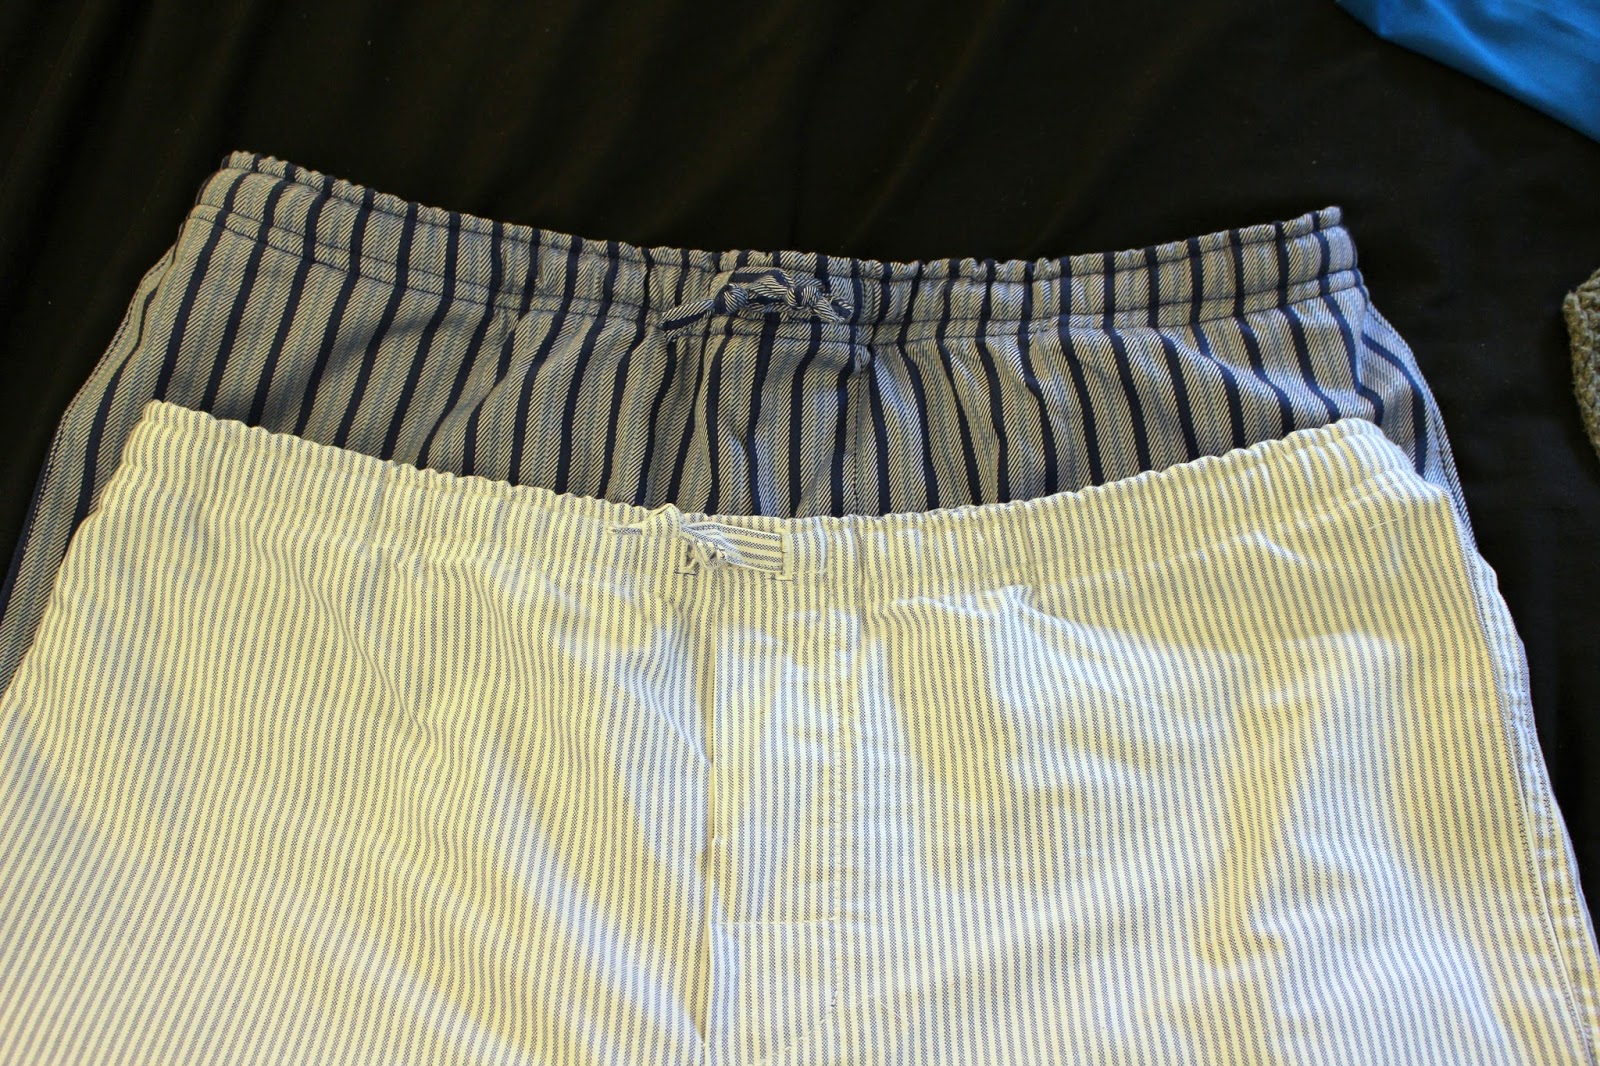
The blouse is enormous on me.

And the FBA didn't really work as I had hoped. It left things a little, errr, pointy.  Overall, the blouse was less fitted than I'd hoped. No matter how I tried taking it in, it still seemed shapeless. Or else it got distorted with pooling or pulling fabric at the back waist. So, I investigated the back... 

I think one of the main culprits in my fitting issue is that the back doesn't have darts. It has a simple pleat. So, the front of the blouse is designed to be fitted with darts, but the back is meant to be much less fitted.  I think this is a bit of a mismatch, and when I compared this pattern to the very similar RTW blouse I own, this is the major difference. The RTW blouse has darts on both the front and back.

The most surprising part of this is that, as I mentioned, Burda usually fits me very predictably, but this seemed very large on me.  That said, I hope that I will be able to save this very pretty swiss dot fabric which I underlined with cotton batiste. I've had Marfy 2155 in my pattern collection for some time. The fit is sure to be more trim.


It has princess seams on both the front and back. So, with any luck I will be able to get a good fit. That said, I'm not 100% sure when I will get back to this project. As the weather takes a turn for the colder, I am already working on wool trousers and some other cooler weather attire. Swiss dot may have to wait until spring, which I hope will be enough time for me to figure out how to sew those sleeves! 

Monday, November 28, 2016

Taco Style: Teddy Sweater

I've been in hibernation for a few weeks. Politics. But I haven't been idle. So, it's time to get back to the blog, and a sweater for Taco seems like a happy place to start.

Knitting sweaters takes forever, unless they are for teeny tiny people. Like my Taco.


I first attempted this sweater back in January and got pretty far. However, I realized that it was coming out WAY too small for my little guy.


A photo posted by Clio (@cliophineas) on


So, I frogged it.

But I'm glad I decided to give it another go with larger needles and in a larger size. Isn't it cute?


This is the Teddy Sweater by Terri Kruse.

I think it is thoroughly adorable even though I'm still not 100% happy with the fit.  The problem is in part my yarn and part the pattern. The pattern page on Ravelry calls for sport weight yarn, but the suggested yarn is Malabrigo Arroyo, which is a DK weight yarn. I knit the sweater up in Cascade 220 Superwash Sport, left over from this frogged baby blanket.


I had used the yarn for these Duck Booties, which also came out small and were consequently gifted to Taco's cousin. So, this yarn may even be thin for sport weight.


That said, I did get a pretty good fit in the end. When I blocked it the first time, I was worried about the width. In actuality, I should have been worried about the length. It is just long enough as is, but is too wide.  So with some re-blocking, I think it will be perfect.


For a sweater, knitting was actually a cinch.  This sweater is knit all in one piece from the top down. Hooray for no seaming! I know it is a great way to get a good fit, but what it means for me is that the sweater will sit - blocked and unseamed - for weeks.


The one thing I did different is the pocket construction. The instructions have you put stitches on hold and cast on new stitches, and then later go back and close up the hole you created. Instead, when I got to where you are supposed to start the pocket, I simply purled the stitches you are supposed to put on hold/cast on to start the pocket. I continued knitting the sweater until the length the pocket was supposed to be. Then I picked up the purled stitches using the white yarn and knit the pocket. This left me with nothing to sew up at the end. I have no idea why you would do it the other way unless you really hate picking up stitches.


The only other detail is that I used a button from the tin of buttons I inherited from my grandmother. I thought that was the perfect finishing touch.

Anyway, I think once this is reblocked, it will be perfect, and Taco seems to like it. He has picked it over his other jackets and sweaters more than once. He's recently shown a preference for clothing that has an animal or other character on it.

So, it is on to the next sweater for Taco while he is still small enough to make it feel worthwhile! 

Tuesday, November 8, 2016

Belated Taco Halloween

I try to learn from my failures...


Halloween 2015

... Like last Halloween when Taco was so very unhappy in his hippo costume and cried for all of the 5 minutes he wore it. So, this year we went with a more clothing-like approach to Halloween.


Taco loves trains. And I love Taco in overalls. So, we decided that he would be an engineer. It was Phin's idea. (Yay Phin!)


Halloween 2016

I already had striped denim in my stash. I had purchased it in the spring before I sewed his first pair of overalls.


I used the same pattern, KwikSew 3145, but in the next size and lengthened. The pattern envelope also has a baseball hat pattern included. So, that became the hat for the costume.  A white shirt and red bandanna finished the look. As I anticipated, Taco wanted nothing to do with the bandanna and hat. But he did look winning in his overalls.


Trick-or-treat HQ at Clio-and-Phinland


I simplified the construction just a bit. As drafted, these overalls have 6 pockets, which amounts to a lot of top stitching.  I eliminated the bib pocket on the front and the painters pocket on the back. I also used a simple running stitch for the top stitching instead of the more time consuming back stitch that I favor for making top stitching stand out. Those two simple changes made the project much less time consuming.


I do plan to sew 1-2 more pairs of overalls with this pattern. However, I will be taking them in a bit. These ones really are rather wide on my skinny little dude. At this point they are also long, but he will grow into them.


One blue lollypop

As for Halloween, while Trick-or-Treating was a bit beyond his grasp this year, Taco did enjoy helping us give out candy and investigating the front porches and Halloween decorations of some of our neighbors. He didn't seem to understand the getting candy part of the transaction and preferred to just say hi. He also ate his very first candy: a blueberry lollypop which left his lips and tongue blue.

We had a great time as a family.


And Taco was happy to be outside on such a beautiful Autumn day.


Tuesday, October 25, 2016

Pajamas the Third! (And Flat Felled Inseam Pockets)

Q: Is there anything better than a favorite pair of pajamas? 


A: YES! Two pairs of favorite pajamas!

Years ago, when Phin and I were first dating and before I sewed, I bought him pajamas for Christmas. They were really great pajamas and lasted through years of near constant wear, broken in to a buttery softness. Until one day...


They sprung a leak!

By that time I was hooked on sewing. So, I carefully unsewed them and used the pieces to create a pattern.  I bought nearly identical fabric at Rosen & Chaddick on the very first PR meet up that I attended.  And soon after, I sewed Phin new pj's - an almost exact clone of the originals.


Pajama Clone 

At the time it was a challenge - I had to learn to sew a flat felled seam and reverse engineer the fly opening. But they came out great, and I was even able to use the original draw cord from the waist, preserving a tiny bit of the beloved originals.

That was six years ago, and the clone pajamas - which have been loved and worn as much as the originals - are nearing the end of their lifespan. So, off I went again to Rosen & Chaddick with a sample of the clone fabric in hand.  And, wouldn't you know it, they still carry the lovely blue and white striped oxford that so perfectly matched the original pj's.

So, here they are, Phin's Pajamas III!  (Which I did not press for this photo shoot since, well, pajamas.)


 And, as a bonus, I sewed him an additional pair in this lush shirting, also from R&C, which I bought for his birthday and had meant to sew up when we were expecting Taco. There was a little additional fabric left on the bolt, which they gave to me for free. So, there is enough leftover for something for myself.


There isn't usually much to say about a repeat sew, but this time I am clapping myself on the back for figuring out a better way to sew an inseam pocket in a flat felled seam. I've always sort of fudged and patched up the pocket. It has never been pretty. But just look at this pocket, complete with seam reinforcing bar tacks!


I feel like it came out pretty darned flawless. Sewing a flat felled inseam pocket must not be done often since there is not a single tutorial to be found and no references to it in my sewing library. Luckily, I found an old forum on the Threads website, which referred to an older forum post on the Pattern Review website. Here's what the Threads poster - Chubello - had to say:

Thanks to an old post by Gigi Louis at Pattern Review I came up with this method:
Lay the front pocket piece into position on the garment front, right sides together. 
Starting at the beginning of the opening, stitch in from the side an amount equal to the seam allowance (5/8 of an inch), then stitch down to the end of the opening and back out to the side. Sort of an open rectangle.
Trim and clip to the corners. Turn inside, press and top stitch.
Lay the other pocket piece over the front pocket piece, right sides together. Stitch all around the pocket pieces. Finish raw edges. You now have a completed pocket on the front. 
To proceed with the side seam, place the front and back pieces together, wrong sides together. Stitch seam being careful not to catch pocket edge. Proceed to press, trim and “flat fell” seam.

It was fairly methodical sewing once I carefully worked out what this all meant. I'm posting it here since I am certain that these are not my last pj's for Phin and I'm not likely to be able to find the thread again. I was not able to find the PR forum post referred to in it.

Anyway, I will leave you with a few more pictures of Phin in his cosy new pj's.


Wednesday, September 28, 2016

Named Patterns: Astrid Wrapped Pants

It seems like forever ago that I sewed Named Patterns' Shane top. At the time, I loved the finished top for it's style and excellent drafting. However, everything about the sewing experience was pretty awful and annoying, from the instructions to the taping AND tracing, to only getting two sizes.


However, Named has changed all that, and I am so pleased to say that the Astrid Wrapped Pants were as much of a joy to sew as they are to wear. Hooray!

I think the style is very fun and a bit different. The legs really are quite elephantine, so it's a good thing that the waist is nice and trim, and sits a bit high. I think it's more flattering that way.


I bought the digital copy of the pattern and printed it out at a copy shop, which adds to the cost, but gives you a very sturdy pattern to work from. This is a size 10 at the waist graded to a 14 at the hips. The fit is spot on for their measurement chart, which is good to know since you are only working with a 3/8" seam allowance. Aside from grading, I made no changes to the pattern. Named drafts for a taller model and these pants were designed to be worn with heels. I actually shortened them just a bit when hemming.


If I make them again, I will adjust the crotch length and shape just a bit. There is something not 100% right about it on me. Nothing major, just needs a little tweaking.

And I would consider carefully before interfacing both front wrap pieces and their facings, as the instructions suggest. I didn't consider that the wrap part of the pants - right on the tummy - ends up having 4 layers of fabric, plus 2 full and 2 partial layers of interfacing. So, you end up with the front of these pants having more body than I think is ideal considering how supremely drapey the rest of the pants are.

Wrap and tie

When I've looked at other versions of these pants on line, including the ones on the Named website, you can see that the front doesn't sit perfectly flat on the underlap area. It's not a deal breaker; it just isn't 100% perfect.


Speaking of drapey fabric, this is from my little stash of fabrics from Carolyn.  Its a poly woven that is substantial enough for these flowy, drapey trousers. It's ravel-prone, so I finished all the seam allowances with my serger. It feels lovely to wear and was just right for this project.  And the abstract print, I think, is dressy and fun.


** UPDATE:  I actually went back and made some changes to the trousers after two wears, which is highly unusual for me. First, on the aesthetic side, as much as I like a wide leg, I really felt that these were a bit excessive considering that I hemmed them for flats. In heels the proportions would likely be better, but heels are just not part of my life at the moment.


Elephantine legs

And on the technical side, the fabric I used is ravel prone, as I mentioned. This was not a problem overall since I finished all the seam allowances with my serger. However, I trimmed the seam allowance back to reduce bulk on the inside of the hems (ie: where you fold the hem up), and those trimmed back seam allowances completely frayed right thru the seams. So, the seams at the ankle beneath the hem stitching was totally shredded. So, thank goodness the legs were wide enough that I could take them in by an inch on both the inseam and outseam, removing 4" of circumference. All of the pictures in this post are from after I made the changes.

Wednesday, September 21, 2016

True Bias Ogden Cami: You Know You're Obsessed When...

I may be just a teensy little bit obsessed with the new True Bias pattern, the Ogden Cami.


Ogdens all in a row


I am not usually one of the first people to sew a pattern, but this cami literally made me drop everything and sew it. Again and again - in cotton batiste, Liberty Tana Cotton Lawn, silk charmeuse and silk chiffon. It really filled a hole in my pattern library for a simple, well fitting cami.


Worn with my Jean-ius trousers

My first version was meant to strictly be a muslin since I was testing the results of an FBA, which you can see below. I decided not to rotate the darts out - I just feel like I get a better fit with darts entact somehow.

Test version in cotton batiste

My test version fit so well that I decided to finish and wear it. Batiste is so light and airy on a sweltering summer day, and I recently discovered I have yards and yards of white batiste in my stash for some unknown reason.

Happy with the fit, I moved on to a remnant of Liberty of London 100% Cotton Tana Lawn. One of the great things about this pattern is that it doesn't take all that much fabric. It's perfect for using up the odd yard+ of fabric or for using a precious/expensive fabric that you don't want to buy too much of.


Liberty version

Next I sewed the purple and black charmeuse version, which I have not done a photo shoot for. It feels luscious on.


Sorry for the i-phone photo


My fourth version is in silk chiffon lined with china silk. Since the chiffon is sheer, I simply used the main pattern pieces to make a lining instead of using the facing pieces.


This one was a little challenging to hem. After a few failed attempts at a machine sewn narrow hem, I took the suggestions of some Instagram friends and did a hand rolled hem - my first, if you can believe it. It's a really sweet finish for this top.


I love that the back is fairly low, but not low enough to reveal one's bra band. Hooray! I love a top with great back.


I love a top that gives good back!

You might think that I would have stopped there with the Ogdens, but I didn't.  As if four wasn't enough, I also used the pattern to rescue a UFO.

Two years ago I started sewing the Future Dress. Christine of Seamwork Radio had posted a tutorial to this Claire McCardell classic 1945 dress on her blog, Daughter Fish. It seemed simple enough even if it did take miles of fabric.  But making the straps was kind of fussy and I was pregnant at the time. I really needed to move on to sewing things I could wear to work, and the idea of hemming all those miles of rayon challis after all the time I had spent sewing french seams... I just didn't have the will power and set it aside. But I pulled it out this summer and fussed some more. However, getting the armscye's and straps right still seemed fussy, and at this point I was starting to mangle the fabric. So, I decided to scrap the original neckling/strap/armscye configuration and McGuyver the whole thing into a bias cut trapeze Ogden maxi dress.


I'm totally in love with its swishy perfection, although I need to shorten the straps just a scooch.


Anyway, Ogden love is going strong over here in the Craft Lounge. I have a feeling that now when I want to sew with a fabric that doesn't really go with the rest of my wardrobe, I'll just whip up an Ogden to go with it. It's so easy to sew and, as always, Kelli's instructions are thoughtful and clear. Plus I have several more ideas of what I want to do with this pattern - like cut it on the bias for a slinkier fit, sew it in a knit as a pj top or lengthened to be a night gown, or make Ogden slips for layering in the winter. But at this moment, I am going to embark on some unselfish sewing and a few other projects to clothe my lower half. But it feels nice to have a go-to pattern like this.

Do you have a TNT like this? A versatile pattern that fills that critical niche? Do tell!