Wednesday, March 29, 2017

Mini Wardrobe Reveal! TNT Patterns for the Win!

Life and sewing are funny. Somehow I find myself super excited about what might be the most sensible and boring sewing project that I've ever undertaken. Back in January I posted about how my plan to sew trousers exploded into a mini-wardrobe project. Well, here are the results.


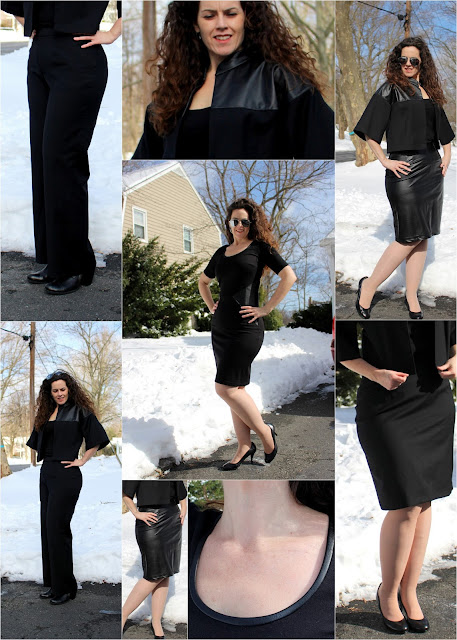
Behold!! It's my 5 piece mini wardrobe primarily for work, composed of a jacket, a dress, trousers and two skirts. A little recap on how this all happened...

If you follow me on IG, you might remember that back in September I redrafted a pencil skirt pattern from Kenneth King's The Skirts. It's more basic than my normal sewing but will lend itself to lots of style manipulation. This is the wearable muslin that I made but never blogged.


But I set it aside temporarily to work on what I really need: more trousers! I used BurdaStyle 9/2010 #115, which is a tall pattern, to make a pair of lined trousers. You've already seen my gold wool trousers from this pattern, which was actually my second version.


For this first version, I pulled out a large cut of black cotton blend suiting from stash to sew up a hopefully wearable muslin. After some final tweaks, the fit turned out to be nearly perfect. So, not a wearable muslin at all.


Wow, I don't really love these shoes with these trousers. Oh well.


Encouraged by my success, I started playing with the suiting fabric and realized that I had more than enough to also make a pencil skirt using my newly drafted pattern and potentially a cute little jacket, too.


And thus was born my mini wardrobe for work. I used OOP Butterick B5567, which I have been meaning to sew for about a year, to make a cute little jacket to go with the skirt and trousers - a 3 piece wardrobe. Since I had some faux leather in my stash, I decided to jazz up the jacket with some faux leather parts, as you can see.

But why stop there? I had enough faux leather for a skirt too! Admittedly, it came out a bit clingy. Maybe it will be saved for date night since Phin seemed to approve.


And since I had a smidge more faux leather and some ponte, I decided to round out the whole thing with a dress.


So, there you have it. My quest to fit my bottom half inadvertently led to a mini-wardrobe project! More on each of these makes in the coming days, but I'll leave you with one more collage of the five pieces.


Saturday, March 25, 2017

Fauxgyle Socks: Business Casual Socks with a Fish Lips Kiss Heel

I almost always have a pair of socks on my needles, even if they aren't my primary project.  Socks are easily portable. They are great to work on when you commute or travel or when you are in between bigger projects. I also find that switching between projects of different weights of yarn/needle sizes seems to help my wrists.


Someone was being helpful

That said, these socks took a long time, even knitting them as an in between, travel project.

I've knit so many socks by now that you might think there isn't much else to learn. Not true! I am just at the beginning of my sock learning, particularly when it comes to the heels. For these socks, I decided to try the Fish Lips Kiss Heel that is the brainchild of the Sox Therapist.  In her words it is, "An innovative, new method for knitting perfectly-fitting, beautiful, simple heels."  


Heel close up

This method requires careful foot measuring done by a friend and some math to calculate where you should start the heel. I did the toe-up version, but top down is also included in the instructions. There is a lot to like about this heel pattern. The short row stitches - she calls them a twin stitch - are really great, and as promised don't leave gaping holes. I found them easier to work than the wrap/turn stitches that I've tried. I didn't perfectly nail the fit of these socks on this first go-round, but that is on me, and not the pattern. The foot of my sock is about 1/4" too long. I'll see how these heels wear compared to my usual sock heel before committing to another pair.


My only less than stellar comment is that the instructions are 16 pages long. Some of it is awesome - there was loads of insightful information about sock fit, comparing store bought and hand knit socks. But 16 pages is a lot of info to wade through or go back and find a specific point you want to reread. So, be forewarned that knitting these socks requires something of a commitment to many pages of explanations rather than just knitting from standard format knitting instructions. And that was just the heel.     

The other reason these socks were fairly slow going is that I am not speedy when it comes to working cables. I'm awkward with the cable needle. The pattern that I used for the sock, aside from the heel, is Business Casual by Tanis Lavallee. It's a faux argyle pattern. I really love how it looks. I could see myself using this very gender-neutral pattern for both men's and women's socks in the future. Hopefully my cable technique will speed up over time. 


There's not much else to say except that I used more of my stash of ToshSock in an flaming orange colorway. ToshSock is very cushy, soft and warm. It knits up densely and has some give. It's a great choice if you want 100% wool, without any elastane/polyamide mixed in.


Oh, right. While knitting these socks, one morning I opened my project bag to see that one of my favorite AddiTurbo sock knitting needles was bent. But the excellent customer service people at Skacel replaced it lickety split at no cost to me. I shall forever sing their praises.

My next socks, which are not yet cast on are going to have another new feature that reader LinB emailed me about.  Stay tuned!

Tuesday, March 21, 2017

New Jacket and Refashioned Skirt!


Here is another two-for-one post! I refashioned this embroidered skirt and liked it so much I made a little jacket to go with it.

I bought the skirt because of how much I liked the embroidery. Isn't it great?


I should have taken before photos since, birds aside, the skirt had some glaring problems. It had a strange asymmetrical flounce at the waist, was about 2 inches too long to be flattering on me and didn't fit well at the waist.  It also had a side seam zipper that was wavy and never ever laid flat.

I fixed all those things, moving the zipper to the center back, removing the flounce, shortening the length and refitting the skirt. I even added a grosgrain facing rather than a new waistband. You can see my not perfect, but always improving, fell stitches at the edge of the grosgrain.

New CB zipper and hook and eye with grosgrain waist facing.
                                                                                                                                                         
It came out really great, if a bit short for my usual office style.


I was so happy with it that I was immediately inspired to sew up an easy coordinating jacket. I used view D of OOP Butterick 5567.

I made view D (bottom right of envelope)

This is the second view of this pattern that I have sewn up, but the first I've blogged about. The pattern is a quick and easy sew and would make a great first jacket pattern for a new sewist. It is unlined, and only slightly fitted. The darts are sewn and then top stitched - a very nice touch. The only fitting change I made was to grade from the 8 to the 12 from the underarm to the waist.

I'm attracted to the shape of this jacket, which you can see well here:


I used a baby blue wool fabric that has been in my stash for quite a few years. I bought it when I was thinking of making a cape - it has a plain weave and a sort of rough woolly feel to it and lofty hand. It gave the jacket a firmer hand than was intended for the pattern. In a thinner fabric with a softer hand, you would get a bit of drape around the collar, whereas this jacket's collar sort of stands at attention, which I like.


The only notable sewing details are that I finished the seams with bias binding. Above is the hem before I turned it, which I also bound in bias tape. You can see the top stitched dart in this pic.

For a closure, I had one largish snap professionally set at Star Snaps in the NY Garment District.


And the one sewing trick that I like for this sort of project is the one where you use fusible interfacing to cleanly finish the edge of your facings. (Below) The method is simple. First, trim 1/8" to a scant 1/4" from the interfacing on the edge you plan to finish (you need this to account for turn of cloth.) Next, sew the fusible interfacing and your facing piece right sides together at the edge that you want to finish. Last, turn to the inside and fuse creating your neatly finished edge. Voila!

Neatly finished facings.


There's not much else to add other than I love this outfit and think this jacket is a real winner for a very simple but cute topper. I'm sorry it's OOP, but I can see how it is a bit of a sleeper. I have a feeling this will not be the last time I sew it. The short sleeve versions would be really fun as part of a casual summer suit in linen.

Stay tuned for my first version of this jacket which is part of my 5 piece mini-wardrobe.

Friday, March 17, 2017

Luck of the Irish: Gold Wool Trousers and Aran Sweater Hack

Today you get two projects in one post: a new pair of trousers and a sweater refashion. You likely saw them both in my "to sew" pile that I amassed during my holiday fabric cutting and organizing blitz.

There they are on the left

Well, here they are, all finished and together! 


This feels rather appropriate for St. Patrick's Day. So, let's start with the sweater, which has been sitting in a closet for about 20 years. It's a 100% wool, hand knit Aran (aka Irish knit) sweater. So, you can see why I didn't want to get rid of it. Yet, I wasn't going to wear it in all of it's oversized it-came-from-1989 glory. Ginormous. So, like I said, there it sat. Moth bait.


Before

When I started working on my gold trousers, I realized I didn't have much of anything to wear with them. I'm not sure how I stumbled on the idea of refashioning the sweater, but somehow the two became a pair in my head.


After


There isn't much to tell about the alterations.  I shortened the length and the sleeves so that both are pretty cropped.  I reattached the ribbed bottom band. I also took many inches out from the side seams, up through the armscye and sleeve. Other than that I left well and good alone. I used my serger to finish all the seams in order to prevent any raveling.     


And there you have it: a more modern spin on a classic sweater. 


Next, the trousers! This is BurdaStyle 09/2010 - #115 Tall Trousers from one of my all-time favorite issues of Burda. Remember this dress? It's also from this September 2010 issue. 


BS09/2010-115 Tall Trousers


There is nothing particularly special about this pattern - they are a basic trouser with slash pockets at the hip and a back welt pocket. The legs are neither wide nor skinny, and there isn't any other particularly distinguishing feature aside from a bit of top stitching, which I ended up omitting in both of my versions of these trousers. The basic-ness was actually a selling point for me, as was the tall sizing, which fits better allover. It's nice to not have to always add length.


As I normally find with Burda, the trousers are very well drafted and the fit really works well on my figure.  These gold trousers, made from a heavy wool twill purchased at MetroTextiles, are actually my second go at this pattern and surely will not be my last. Between the two versions of these trousers, the changes I made include: 
  • Full seat adjustment (about 1/2 inch) using "the usual method" in this picture
  • Shortening the front crotch (3/8") like this 
  • Taking in the waist in 3 places: 
    • Side seams
    • CB seam 
    • Making the darts larger and longer on both the front and back 


In addition, I lined these trousers and omitting the belt carriers. Also, the notch on the CB waist, which is a design feature that I like, was unfortunately eliminated as I sewed when I took in the CB waist. Oops. There are a few little tweaks that I want to make before these will be a true TNT pattern, but nothing truly substantial at this point.


The challenge that I encountered with these trouser were entirely due to the heavy, bulky, loosely woven twill fabric.  It was ravelly and shifty.  There are a few places like the fly and the pockets that don't lay perfectly flat because of the bulk. So, this was actually a very good lesson about working with bulky fabrics for trousers; in the future I would have made the fly shield, inner waistband and such from a lighter, thinner fabric to reduce bulk at the fly and waist.

As for sewing, I never even looked at Burda's instructions. I've sewn enough pants to know how to sew them and use my preferred methods.  One new to me method was using Kenneth King's origami welt pocket tutorial from his Craftsy class on pockets. I use his double welt pocket tutorial every time I make a double welt, and his method for a single welt also did not disappoint. I have a neat and tidy pocket, although next time I'd make the welt shorter. This one is a bit exaggerated.


Anyway, I have a few other pieces of lighter weight fabric picked out for spring/summer trousers from this pattern.

And there you have it! I have a whole new outfit, half refashioned and half from scratch.


Phin and I took lots of pictures yesterday, so I have a big backlog of posts that I will be putting up over the next few weeks! Hooray for blogging!

Monday, March 13, 2017

Chocolate Crinkle Cookies

I thought I'd pop my head up to say hi and that while blogging time remains elusive, sewing and knitting continues apace. At last count I have 10 unblogged sewing projects and at least 2 knitting ones. C'est la vie.  But I'm hoping to find some time to photograph these projects this week. Fingers crossed.

Over the last few months, I've tried a bunch of new to me recipes and here is the real winner from the bunch: chocolate crinkle cookies from ATK. They are like mini brownies, but in cookie form. And the crackled sugar coating really makes them one of the more attractive things to come out of my oven.


Chocolate Crinkle Cookies
1 cup (5 ounces) all-purpose flour
½ cup (1 1/2 ounces) unsweetened cocoa powder
1 teaspoon baking powder
¼ teaspoon baking soda
½ teaspoon salt
1 ½ cups packed (10 1/2 ounces) brown sugar
3 large eggs
4 teaspoons instant espresso powder, (optional)
1 teaspoon vanilla extract
4 ounces unsweetened chocolate, chopped
4 tablespoons unsalted butter
½ cup (3 1/2 ounces) granulated sugar
½ cup (2 ounces) confectioners' sugar
1. Adjust oven rack to middle position and heat oven to 325 degrees. Line 2 baking sheets with parchment paper. Whisk flour, cocoa, baking powder, baking soda, and salt together in bowl.
2. Whisk brown sugar; eggs; espresso powder, if using; and vanilla together in large bowl. Combine chocolate and butter in bowl and microwave at 50 percent power, stirring occasionally, until melted, 2 to 3 minutes.
3. Whisk chocolate mixture into egg mixture until combined. Fold in flour mixture until no dry streaks remain. Let dough sit at room temperature for 10 minutes.
4. Place granulated sugar and confectioners’ sugar in separate shallow dishes. Working with 2 tablespoons dough (or use #30 scoop) at a time, roll into balls. Drop dough balls directly into granulated sugar and roll to coat. Transfer dough balls to confectioners’ sugar and roll to coat evenly. Evenly space dough balls on prepared sheets, 11 per sheet.
5. Bake cookies, 1 sheet at a time, until puffed and cracked and edges have begun to set but centers are still soft (cookies will look raw between cracks and seem underdone), about 12 minutes, rotating sheet halfway through baking. Let cool completely on sheet before serving.


If you are thinking, but how do they taste? The answer is really really good!  They are chocolate decadence. 


The cookies are rather large as you are directed to make them. I found that one cookie was enough. But really is one cookie ever really enough? So, on my next batch I made half of the batter/dough into the large size cookies (2tbsp) and half into much smaller cookies (scant tbsp). It worked out well.


I need to tinker with the timing of baking the smaller size. The larger cookes, which I baked first came out fudgey and dense, and smaller cookies came out more like a rich cakey brownie. So, depending on your brownie preference, you can adjust your cooking time so you have either a more fudgey or a more cakey result.  (I am a fudgey girl all the way!)

Anyway, if you crave a very chocolaty almost brownie, I highly recommend giving this recipe a shot.