Monday, June 25, 2012

Tailoring Leather: Back Stay and Turn of Cloth

Staying focused on my leather jacket has become challenging now that summer has arrived. But I did get two important tasks done this weekend.

First, I created a back stay.  The back stay stabilizes the shoulder area and collar, keeping it from stretching out or distorting. It also supports the garment fabric and creates a more smooth line across the shoulder blades. My leather does have some give, so I figured that it should have a back stay to support it.

I made a pattern by tracing the back of the jacket onto tracing paper.


And then cutting it out of a firm muslin, using pinking sheers for the bottom edge.


Here it is basted into the jacket back. 


The other - and more difficult - task was dealing with the lapels. I wasn't happy with how they were lying on the jacket - once I tried attaching the shoulder seams they refused to lay flat - there was too much fabric on the underside of the lapel and it wasn't curving appealingly over the jacket bodice and around the neckline. I hadn't considered that turn of cloth would play a role with leather, but it appears that it does. Thankfully I had only basted the lapels to the bodice in the seam allowance and not on the seam line. So, there should not be any visible holes in the finished jacket.

To fix  the problem, I "pinned" (with binder clips) the lapels to the jacket front pieces while I was gently rolling the seams in the direction they will ultimately go and tugging the under collar so it peeked out a bit more at the seam allowance (since the undercollar needs to be a smidge smaller than the upper collar.) Then I trimmed the under collar. It made lining up and stitching the shoulders much easier. Now I think the lapels will look good once the jacket is finished and all the seam allowances are going in the directions they need to go.

Here's the jacket, with shoulder and side seams stitched, but minus the sleeves.


Lapels, back stay... all behaving


And in case you are curious to see the insides of the jacket front with my hair canvas interfacing, well, here you go. 


There seems to be plenty of guidance when it comes to actually sewing on leather, but less when it comes to tailoring a leather jacket. Consequently, I'm moving at a snail's pace and thinking through every step of this project as I go. It's mentally tiring sewing, if you know what I mean. And I'm having a hard time staying at it for hours at a time. I seem to do better tackling one small task at a time. The worst thing for my jacket would be if impatience lead to a mistake. So I'm keeping at it, but moving slowly and taking breaks.

To keep my sewing mojo up, I've decided to work on some shorter, easier projects while I finish up the jacket - nothing that requires much thought. Anyway, stay tuned because I'll hopefully have a new finished project in the next week.

Friday, June 22, 2012

You Scream, I Scream: Wow, it's Hot

Boy was it steamy in the Northeast on the first full day of summer! 

Thanks to Dr K for sending me this ecard! So true! LOL

One of the truly great and often overlooked things about being an adult, IMHO, is having the autonomy to decide to skip dinner and go right for dessert. I've been known to have ice cream for dinner on really hot days. Last night, I even made my own.


My first batch of ice cream for this summer is Gianduja Gelato from The Perfect Scoop. Those of you who are more recent readers may not yet fully appreciate the epic nature of my love of nutella. And peanut butter, but that's a different post.

If you are not familiar with Gianduja, it hails from Torino, Italy and, flavorwise, is that same nutella-like mix of hazelnuts and chocolate. Yum. Last year I made a peach and a strawberry ice cream from this book (somehow I didn't blog about them), but this is the first time I've made a custard based ice cream (with eggs) rather than a Philadelphia style ice cream. Some people fear making custard, since there is a risk of ending up with nutella-flavored scrambled eggs (ewwwww!!!). But as long as you temper the eggs by slowly adding some of the warm custard while whisking and keep stirring the custard while it thickens, you should be fine. Just don't rush.


Gianduja Gelato

1 1/2 c hazelnuts, toasted and with skins removed
1 c whole milk
2 c heavy cream
3/4 c sugar
1/4 tsp salt
4 oz milk chocolate, chopped
5 large egg yolks
1/8 tsp vanilla
Chop nuts finely in a food processor. Heat the milk, 1 cup cream, sugar and salt in a saucepan until nearly boiling.  Add nuts and let steep off the heat for 1 hour. Heat the remaining cream and pour over the chocolate, stirring until smooth. Pour the hazelnut mixture through a strainer into a saucepan squeezing the nuts to extract all the liquid. Discard nuts. Rewarm. 
Temper the egg yolks with the hazelnut mixture and then add eggs into saucepan. Stir constantly over low heat until the mixture coats the back of a spoon. Pour the mixture through a strainer and into the chocolate. Add the vanilla and cool in an ice bath.  Chill thoroughly and churn according to you ice cream maker directions.


Be patient with your egg yolks!

To up the chocolatey-ness, I also added "stracciatella" or chocolate shreds to the gelato. I generally don't like chocolate chips in my ice cream - they get all hard and cold. But by melting some semisweet chocolate (5oz) while you churn your ice cream, and then pouring it in in a long stream at the very last minute of churning, you get thin shreds of chocolate throughout. Delicious!

mmmmmmm...dinner!

The only thing I plan to do different next time is use fresher nuts (Whole Foods rather than pre-bagged supermarket nuts) so the flavor is even more intense. 

Happy Friday, everyone!


Wednesday, June 20, 2012

My Increasingly Off-Season Creations

As if it isn't enough that I'm sewing a jacket, now I'm knitting a sweater, too. Sheesh.

The minute I said I needed a summertime substitute hobby for knitting - who wants to deal with all that wool in the heat? - I suddenly realized that I desperately wanted to be knitting something. I'm heading to London for work and my colleague who knits invited me to their lunchtime knitting circle. So, I want to be knitting something fun, and I need a little break from socks; those purple ones took a lot out of me. 


So, I'm knitting a sweater. In my defense, I picked gorgeous mercerized cotton for it and the pattern is for a sleeveless, halter-like top. Very summery, if you can call a sweater summery. Here's the start of it.


After working on very small needles for my socks, I can't help but feel like this sweater is coming along pretty quickly, even though I had a few bumps at the beginning that had me doing almost as much un-knitting as knitting (tink tink tink). But now it's coming along nicely.

Also, in a merging of hobbies, I've started practicing my jewelry techniques by making stitch markers for my knitting. While buying needles for this sweater project, I noticed an expensive display of  cute bead stitch markers sitting on the yarn store counter. And, as I was walking back to my office, an unstoppable magnetic force pulled me off the street and into the clutches of a few of the bead shops on 6th Avenue. A few inexpensive bags and strands of beads and some jump rings later, and I've got stitch markers. Hooray.


And I've got the materials to make a whole bunch more.

Monday, June 18, 2012

(Starting to Look Like a) Leather Jacket: Zip it!

Look at my jacket! It's actually starting to look like a jacket.


Or at least several large pieces of jacket...
 
Front

Back

 And unlike the muslin, this time I put the zipper in correctly on the first attempt. (Phew.)


I bought this zipper at Botani Buttons, which has recently expanded their store significantly.  They now have a whole room full of zippers that they will trim to a custom length for you while you wait. I was happy to take advantage of this service since I needed a non-standard length separating zipper and potentially could have run into disaster if I tried to do it myself (read: ineptitude with pliers). I was told that the Lampo zipper that I bought is what the house of Chanel uses. So, I'm now thinking of this jacket as the closest I will ever get to owning a Chanel jacket. LOL. Anyway, those of you in the NY area should check out this new section the next time you are looking for a zipper for a special garment (read: not cheap). But look how lovely.

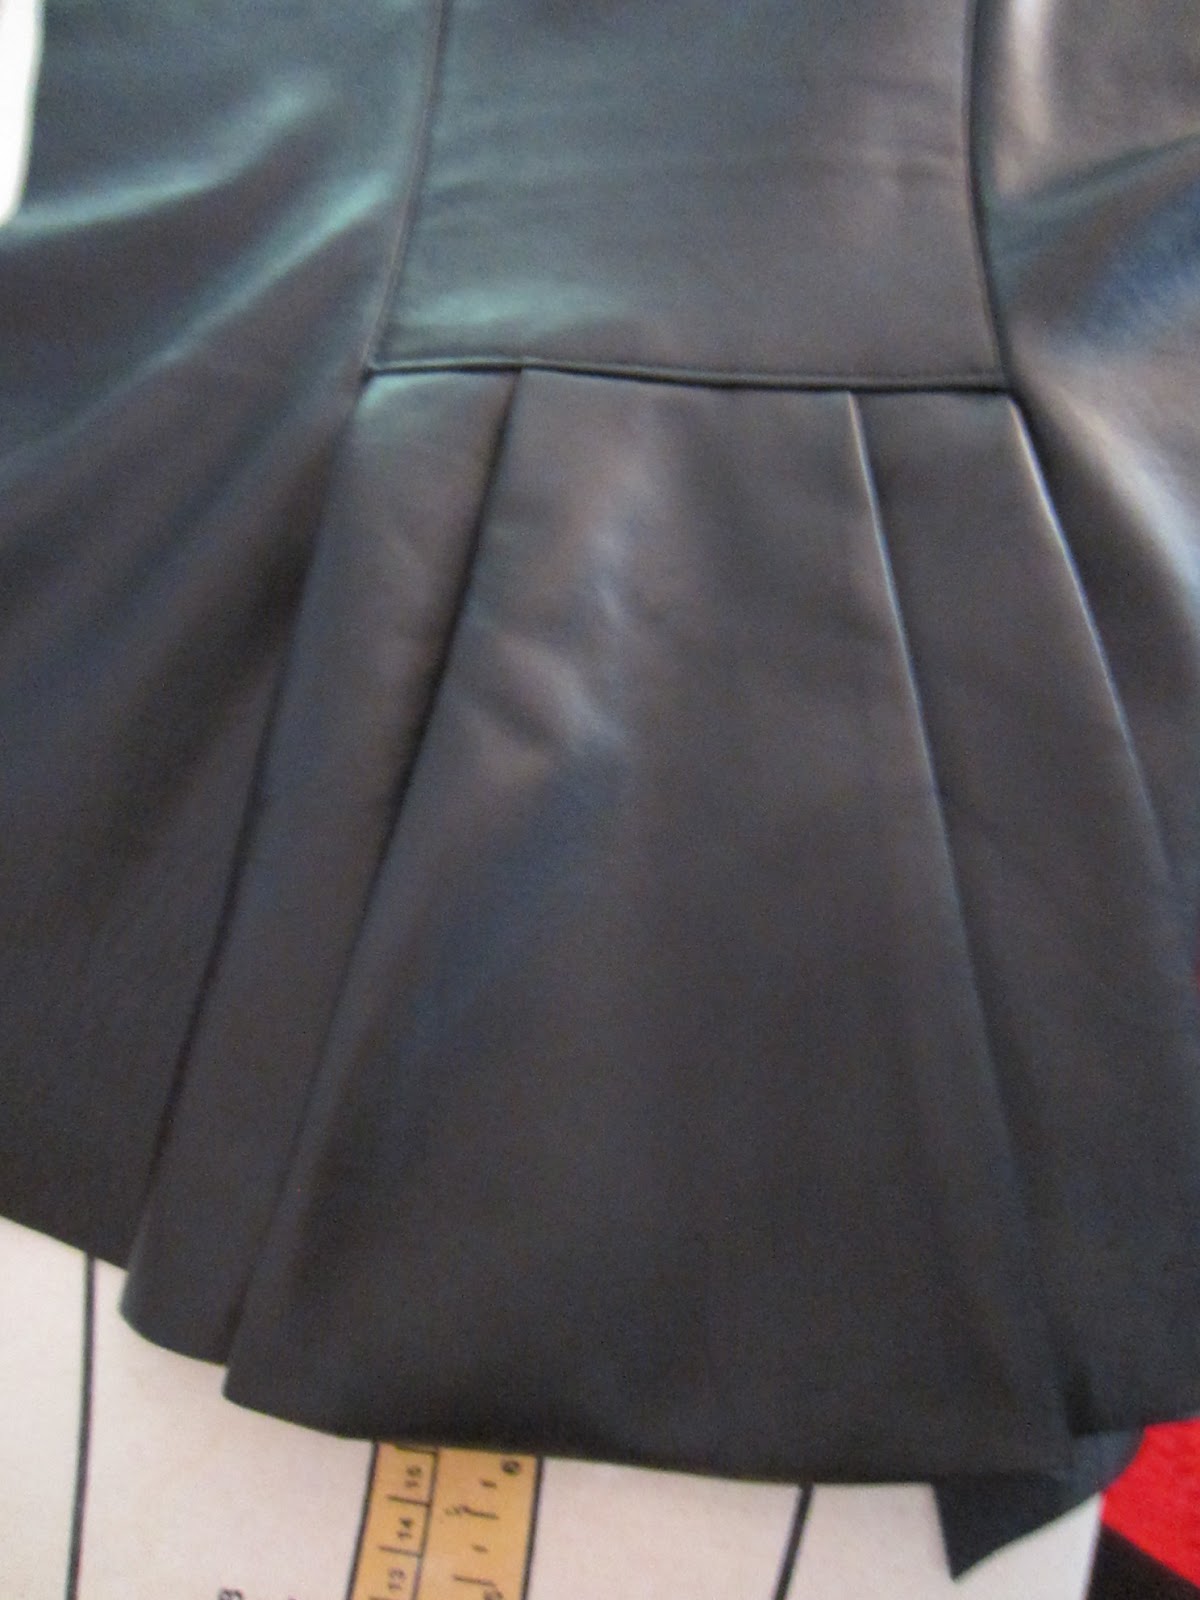
Also, check out the peplum:


Seriously, there is something to be said for ironing leather. How else would I get the great pleats?

Pleated peplum with topstitching = awesomesauce
 Next, I have to make a pattern for the back stay. That's the only reason that I didn't get to sewing the front and back together.  Stay tuned.

Friday, June 15, 2012

Sewing On Leather: Stitching and Seams

Now that I've confessed to fusing all kinds of fusibles to my leather with an iron, it's time to talk about how I'm sewing things together.

There's been a bit of chatter in the blogosphere recently about how useful (or not) tutorials are when written by novices or those who don't know good technique. I've never written a tutorial, but I do like to blog about  the techniques that worked for me as a part of my sewing journey. So, I feel the need to add this disclaimer: this is what is working for me on my very first leather project and with the tools and leather that I am using. I am not an authority; I'm a learner. And I welcome any and all comments and suggestions on better techniques. OK, on to the fun...

Stitching on Leather test scrap

Basics
As far as stitching goes, a slightly longer stitch length coupled with a leather needle seems to be the usual best practice. Do not backstitch (why make more holes?) and instead just tie off your thread ends. So all of that is what I did, too.

If you look at the test scrap below, you can see what happens when you pull out a row of stitches - it leaves a very visible line of holes! This test was enough proof to convince me to take things slowly!

The line of holes is the second line from the right (photo center).

Also, since you don't want to pin your leather, use small binder clips. I got some fun hot pink and lime green ones at Staples for $1.99 for 20, which beats the pants off of Wonder Clips, which seem to be pretty expensive on-line and I can't seem to find anywhere in the Garment District.


The Actual Sewing
Sewing Machine: Fancy Modern Viking vs. Granny's Kenmore
So, I was contemplating which machine to use for sewing this jacket - my computerized Viking Sapphire or my vintage Kenmore that was inherited from my Grandmother.

After MUCH testing on scraps and looking at the stitches and seams, I've decided on a compromise: I'll do most of the sewing on my Viking because of how easy it is to use and adjust as I go. Honestly, this is the machine I'm most comfortable using and it has a leather setting which worked beautifully. 

However, since the very best looking stitches that I made were on my Granny's old Kenmore, any stitches that will show - topstitching, etc., will be done on Granny. Also, since the old Kenmore sews slowly as a rule, one of the benefits is that it will slow me down and hopefully keep me from messing up the areas where the stitches will show.

Presser Feet: Teflon vs Rolling Foot

I really wanted the rolling foot to win, but the teflon foot won by a nose.

I've seen recommendations for both of these feet, and in my tests, there really wasn't a huge difference, but to my eye and hand, it just seemed like the teflon foot fed the two layers of leather more smoothly and evenly.

I also tested using my narrow zipper foot and that actually worked out pretty well, too. So I'm not really sure how big a difference any of these feet really make in the end. I plan to use the zipper foot for the zippers since I'll be sewing on the zipper tape and not the leather.

Opening the Seams
Again, I tested every method I could think of or had seen recommended for opening the seam allowances and "pressing" the seams open.

Finger pressing: This was fine to get things started, but not particularly effective. The seam stood up like a spine.

Finger pressing was ineffective
  

Rubber mallet:

Bashing with a mallet
Next I tried using a rubber mallet with the seam spread open over a piece of molding that I pilfered from my father-in-law (the mallet is his too). It was somewhat effective, although the seams didn't lay precisely flat even after much bashing.


Iron: I hope at this point you aren't surprised that I took a hot iron to my leather. And, quite frankly, the iron - used with a silk organza press cloth and my piece of molding - was easily the most effective method of  opening the seams. Honestly, they behaved perfectly and there seems to be no adverse effects whatsoever. 

Good old iron and pressing cloth


Glue and Tape:
 
Glue, binder clips and leather tape in 1/4" and 1/2" width.
To finish the seams, I tested gluing them down, topstitching and using leather tape in 2 different widths. The glue was very messy (read: making a mess is part of my baking process. But what works in the kitchen is not appropriate for the Craft Lounge.)

I thought I'd found a good solution when I tested the leather tape. It basically is double sided, super sticky, clear tape. It really held down the seams, but when I tried to topstitch, the only thing I accomplished was totally gunking up the needle to a point where it got stuck in the leather. Not good.

Leather tape in action.
Quite frankly, I don't think glue or tape is necessary. If there are any unruly seams that aren't going to be topstitched, then I would use the tape. But overall, I don't think I really need to do either of these things.

In the end, the verdict is that some seams will be top stitched and some will just be pressed open. And I'll see how it goes.

So, there you have it! And here you have the back of the jacket - stitched with my Viking and pressed open with my iron. Oh, and by the way, I had no trouble with the back shoulder princess seams. I've heard that leather doesn't ease well, but these seams eased together nicely.


My jacket is in a bunch of pieces at the moment, but I hope will be looking more jacket-like by Monday. Have a great weekend and stay tuned!

Tuesday, June 12, 2012

Leather Jacket: The Bones

OK, this is possibly the post in which I shock and horrify the people who know more about working with leather than I do by talking about how I used my iron over the weekend.

Whenever I start a new project I always try scorching a scrap of the fabric. Does that sound crazy? Maybe it is, but I like to know how hot an iron my fabric can take before I try to press the actual project. So, I start on low and slowly nudge the heat ever higher. I usually use a silk organza pressing cloth and a seam roll and tailor's ham. No exceptions here. And - guess what - the leather didn't scorch even with a very hot iron. 

After establishing that I could safely press my leather, I began testing a few fusibles. This wasn't so far off the reservation since it had been suggested in my book on leather, and I'm very pro-interfacing in general. I use a lot more than called for in patterns, and I've never been unhappy that I interfaced a zipper or waist or armscye or any other stress point on a garment. Interfacing often makes it easier to sew on a zipper, and I find that it adds to a neater overall look in a finished garment.

I also learned to appreciate hair canvas when I sewed my Lady Grey Jacket last winter - it adds body and shape to the front of the jacket and the lapels and collar. So, I figured that my leather jacket deserved the same treatment.


I'm not sure you can see the black interfacing on this, but it's there.

In the end, I decided to use black Pro-Tricot Deluxe fusible interfacing for the zipper areas. I normally use this for knits, but it also is fine for leather according to the handy instructions that came with it. And I used fusible hair canvas that I bought at Steinlauf & Stoller for the front, side front and lapel pieces. I like that it adds some body to the leather and, I hope, will help the front shaping.


So, now that the bones are in place, so to speak, I'm ready for zipper insertion. If you recall, when I first tried doing this on muslin, I messed up three times. So, I will be slow and steady making sure I get it right the first time! 

Later in the week, we'll talk more about seams and sewing machines. Stay tuned.

Friday, June 8, 2012

Jewelry Making for Dummies: Oooohhh, Sparkley...

Update at noon: So Phin just told me that our on-again, off-again family visit is now off again. So, it looks like the Craft Lounge will be mine-all-mine all weekend! Yay!

I'm not sure how much sewing will get done over the weekend since visiting family is inhabiting the Craft Lounge. Sigh. This project seems like one delay after another.

But I've been trying to find things to do with myself at night as I sit on the couch while Phin watches baseball or hockey. At the moment, I don't have any hand sewing to do and I've been undecided on what I want to knit next. So, I picked up Jewelry Making for Dummies to try making a few simple pairs of earrings.


Three pretty pairs of earrings!

Quite frankly, I'm always irritated at just how much a cute little pair of earrings can cost. Obviously, something that takes time to create and uses good materials is worth paying for. But I've bought too many earrings that turned out to be poorly made and used shoddy parts.


Venetian Glass earrings

Dyed jade with glass beads


More dyed jade


This project required little time and less talent. I only had to learn one technique - making a wrapped loop on a headpin - to make these three earrings. So, a good investment of an evening or two on the couch.

Since there's a whole strip of bead stores right near M&J Trim, it was easy to buy a few basic tools, beads and findings near my office. I fear this is a habit in the making; I already have a few projects in mind.

Hope you all have a great weekend!